If you have no experience creating actions in Photoshop, I recommend you read my article How To Use Actions In Photoshop which provides the foundation of the following tutorial.
Once you understand the basic concept behind photoshop actions and how to create them, you’ll quickly begin to come up with very creative ways of automating specific tasks and processes in your existing digital workflow.
But in order to exact the full potential of photoshop actions you’ll need to learn how to apply actions to entire folders of imagery.
Not to many people realize that actions aren’t limited to a single image and that there is a feature in photoshop called “Batch” that enables you to apply actions to as many images as you like that may already be open or contained within a folder on your computer.
Getting Started
In order to be able to perform batch corrections in Photoshop using actions, we need to first have actually created an action from which to work with. So if you don’t already have an action created go ahead and read the previous article and create you first action.
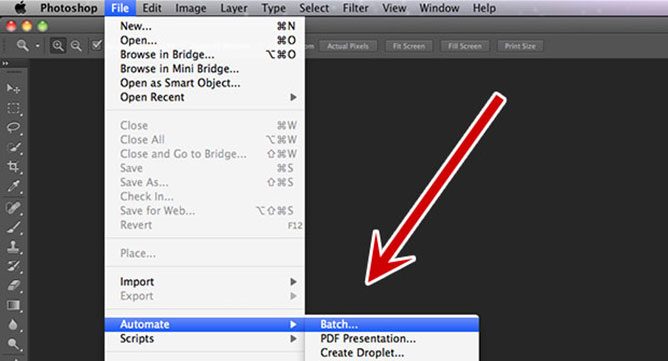
So the first thing I need to do in order to perform a batch correction is to open up the “Batch” dialog window which is located under “File > Automate > Batch”.
Within the “Batch” dialog window you’ll find four main sections. Play, Source, Destination and Errors.
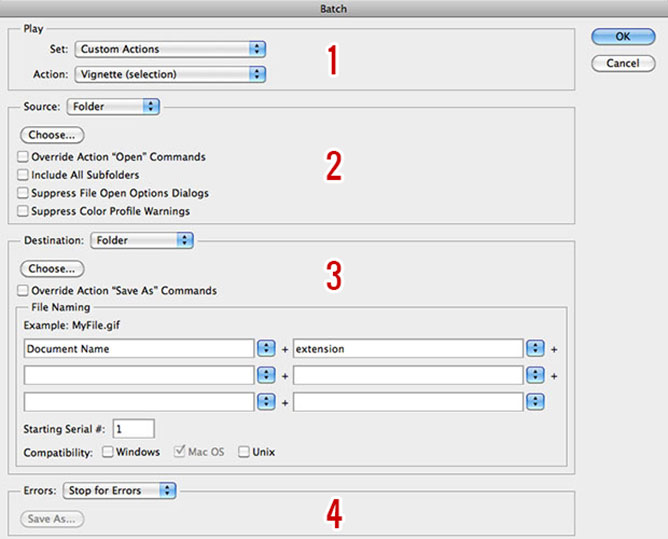
1. Play
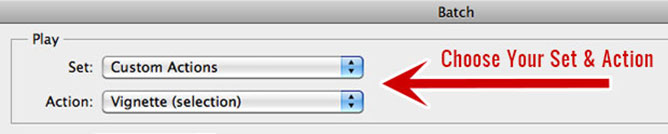
I’m going to start out by first selecting an action set and then a custom action within that set that I would like to be applied to my images.
2. Source
I then need to select my source type where you’ll find four different options (Folder, Import, Opened Files and Bridge). In most cases you’ll choose “folder” when working with large quantities of photos, specifying the exact folder location on your desktop.

Underneath source you’ll find a checkbox called “Override action open commands”. This option does exactly what it states. When you first create an action you can record the process of opening an image file in photoshop. This includes information like the file name and folder location of an image on your computer.
By checking this box you can override those recorded commands and replace those with the options you specify in the source fields.
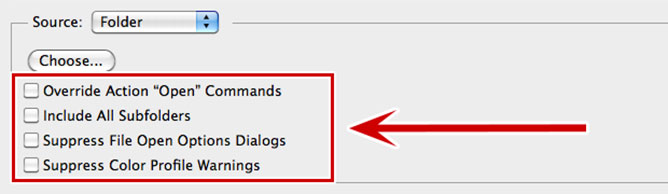
Now depending on your preferences in Photoshop and how you’ve set up your custom action you may wish to suppress “File Open Options Dialogs” and also “Color Profile Warnings”.
If you are unsure go back through your action and check to see if you’ve included any open option and color profile commands. Plus you may want to double check Photoshop’s preferences and color settings.
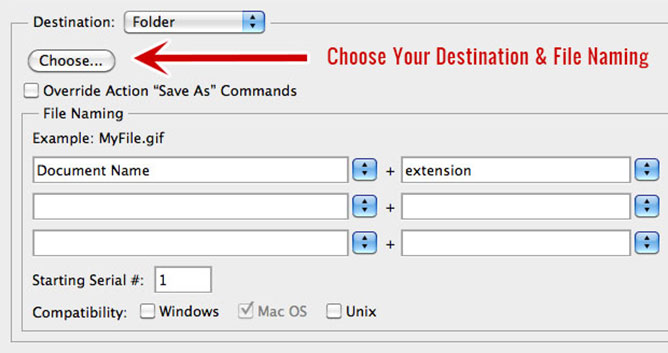
3. Destination
Once you’ve selected a source, it’s time to choose a destination. The destination options determine how you handle image files after an action has be applied.
You can choose whether to override your original image file by selecting “save and close” or you can save your converted images to a new folder leaving the originals completely unaffected (this is the option I prefer).
Underneath destination you’ll find a checkbox called “Override action save as commands”. This option does exactly what it states. When you first create an action you can record the process of saving of an image file, file name and folder location on your computer.
By checking this box you can override those recorded commands and replace those with the options you specify in the destination and file naming fields.
4. Errors
Finally, if you wish you can choose to “Stop for Errors” or “Log Errors to File” to gain more insight into the success of your batch processing. Ordinarily, I leave this set to “Stop for Errors”, but if you’ve set your action up correctly you shouldn’t have any issues.

So as I’ve shown in this demonstration, once you’ve created an action it’s relatively simple to setup a batch conversion, keeping in mind that if you’ve already added “open” and “save as” commands to your actions that you may wish to override these by ticking the appropriate checkbox. This will avoid any disruption to your batch corrections.
I hope you’ve enjoyed this tutorial, please leave your comments below if you have any questions and I would really appreciate it if you would share this with your friends on your favorite social network.


Share This Post With Your Friends...
Share the post "How To Batch Process In Photoshop Using Actions"