Performing Photoshop adjustments can sometimes take a lot longer than they should if you’re inexperienced and unaware of how to speed up your digital workflow.
Take for instance how to resize images which is a fairly straight forward task, however it starts to become complicated when you consider how to resize multiple images at once.

Luckily, Photoshop is more than capable of applying complex corrections to more than one image and when implemented correctly will save you a lot of time.
So, How Do You Resize Multiple Images In Photoshop?
You could go to the extravagance of creating a custom resizing action that could then be applied as part of an automated batch process, however there is a slightly quicker method that involves less configuration whilst still providing all advantages associated with using custom actions.
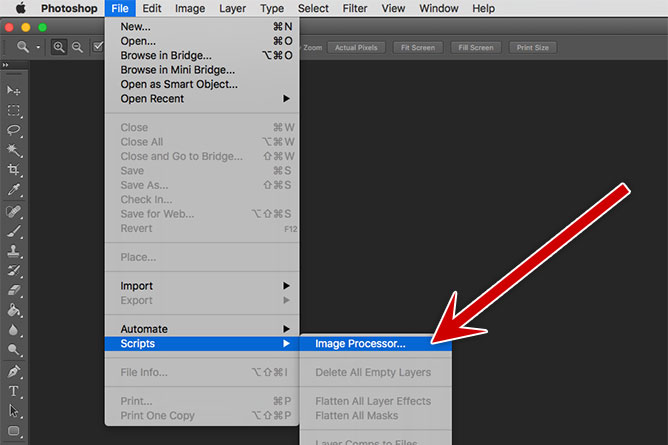
Image Processor
Image Processor is a default Photoshop script that was designed to simplify the process of resizing multiple images with little to no effort… It’s located in Photoshop navigational menu under File / Scripts / Image Processor…
Open Photoshop Script
Upon opening the script you’ll be presented with a dialog box that will walk you through how to configure each step before running the image processor. It’s relatively straightforward, only involves four steps and therefore it shouldn’t take you very long to complete.
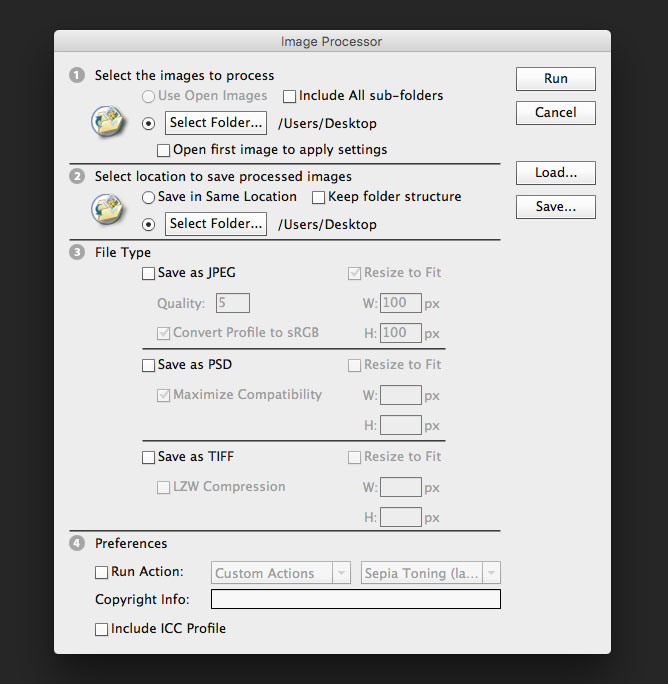
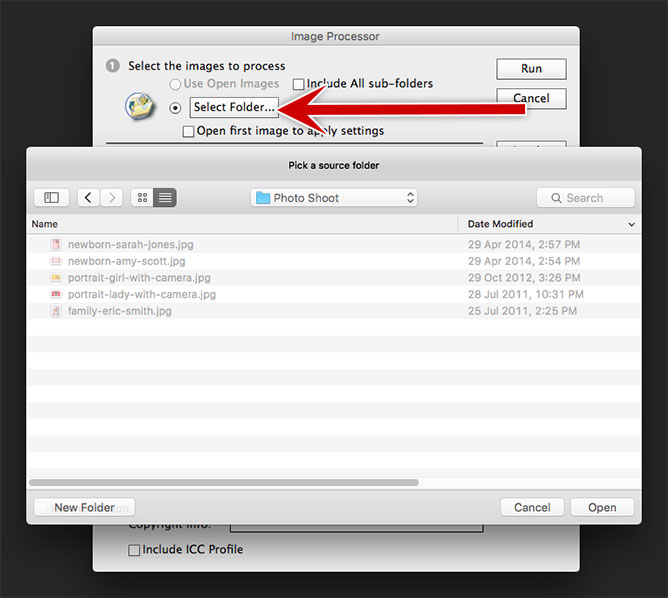
STEP 1 ) Select The Images To Process
In most cases you’ll check “Select Folder…” and identify the source folder that contains all of the images you would like resized.
However, there will be occasions when you already have images open in Photoshop and instead of choosing a folder you can simply check “Use Open Images”.
“Include All Sub-folders” is self explanatory, when the script is run it will process all folders within the selected source folder.
Under “Select Folder…” there is a checkbox option that when enabled with will “Open first image to apply settings”. So, what does this setting mean?
If you are processing a group of camera raw files taken under the same lighting conditions, you can adjust the setting in the first image to your satisfaction and then apply the same settings to the remaining images.
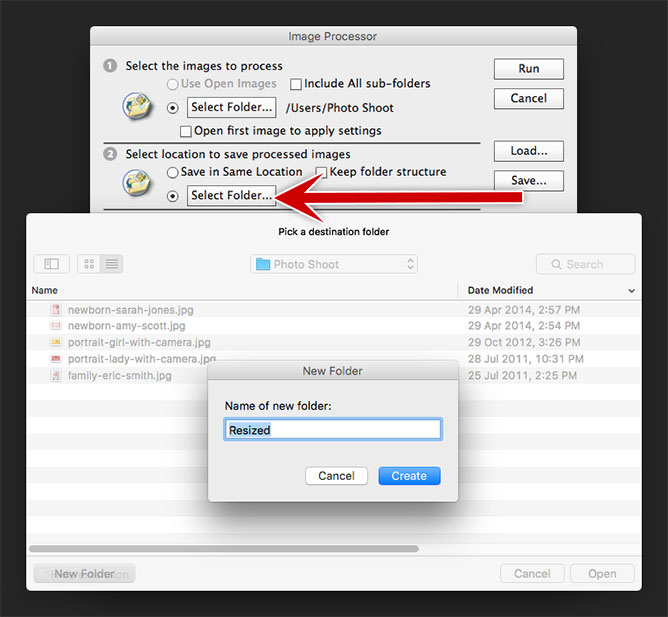
STEP 2 ) Select Location To Save Processed Images
As a rule of thumb, I alway create a new destination folder (named accordingly) for saving the processed images. It keeps things nice and organized, plus is easily identifiable.
If you “Included All Sub-folders” from step one you’ll probably want to check the “Keep Folder Structure” option to avoid any potential for confusion in the future.
STEP 3 ) Select File Type & Image Dimensions
You have the option of choosing from three different file types (JPEG, PSD & TIFF) to have your images saved. You’re not limited to only one type and can select all three if required.
Each file type has it’s own custom settings that you would usually expect to find when saving photos in these formats for instance compression quality.
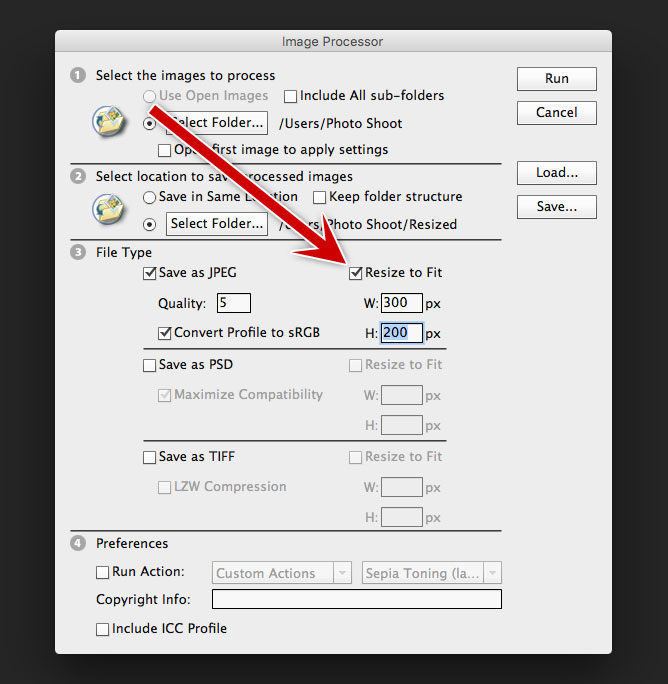
Once you’ve selected the appropriate file type, it’s time to check the “Resize To Fit” option. Go ahead and enter the maximum width and height (pixels) you would like your images to fit.
Please, keeping in mind that each image will retain it’s original proportions and will not be distorted.
STEP 4 ) Preferences
The inclusion of actions within the image processor preferences has almost made automatic batch processing redundant from the perspective of resizing multiple images at once.
Because not only can resize your images, but you can also apply existing or custom created actions to your selection of images with ease such as adding a custom watermark.
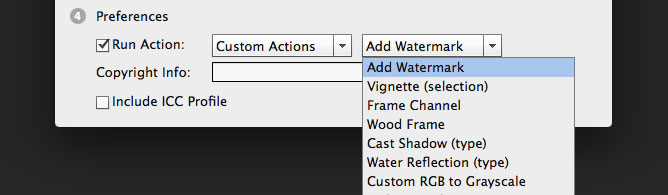
Now of course, if you’re only interested in applying custom created actions then batch processing offers the additional benefit of file naming which can come in very handy when working on a client’s photo shoot.
As well as actions you can include “Copyright Information” and “ICC Profiles” with your newly resized images.
Plus, don’t forget that there is an option for saving your settings as a preset which can then be loaded for future photography projects, very handy indeed.
Run Script
Now that you’ve successfully configured the Image Processor, click “Run” and watch Photoshop batch resize multiple images… Once complete, navigate to your destination folder and open your images to ensure all were processed correctly.


Because of step 3, I always end up creating a new library in Lightroom with the images I need to resize since BOTH dimensions have to be input and there is no dpi setting.
Since I think in terms of inches when downsizing to 72dpi, (or whatever dpi) this dialog in PS really isn’t useful for me for this purpose. I want to be able to set the long dimension ONLY and let the short dimension fall where it may. If you have a mix of horizontal, vertical shots, and cropped images, the physical size will end up all over the place and in the instance of cropped images, distorted.
Where the Image Processor IS useful is when I have batch of 16bit tiffs that need to be converted to jpegs. PS does a MUCH MUCH better job of this compared to using LR to just export the images as jpegs. 100% jpeg quality in LR is not as good as “12” quality outputs from PS.
I was very surprised to find this out when highlights from LR jpeg outputs from RAW originals lost detail in the highlights vs converting in PS from 16bit LR outputs.
Thank you Eric for your valuable insights.
I agree, if your photo shoot consists of landscape and portrait formats there’s no option for resizing based on the longest dimension of the image which can be quite frustrating.
That’s very interesting you should mention the difference in quality between Photoshop and Lightroom when saving / exporting to jpeg. I’ve never noticed that before which is why I’d like to do a comparison to satisfy my own curiosity.