

A couple of years ago, I had taken to the skies for my first attempt at aerial photography. With my feet now firmly on the ground, I revisited browsing through hundreds of exposures in an effect to isolate worthy images.
It was long before I discovered an image with reasonable composition and positioning of the elements. Unfortunately, I had missed out on capturing the perfect light at dusk because of the flight time restrictions.
Unhappy with the color of the sky in my photograph, I decided to fix it.


Photoshop makes it incredibly easier to manipulate the color of the sky through the use of adjustment layers. However, to create a realistic sunset that is graduated in colors you’ll need to utilize gradient layers.
Gradient layers can mimic that effect that is created when using graduated filters in front of your camera’s lens.
What I had originally visualised in my mind was going to require a little bit of photoshop editing in order to achieve my desired outcome.
Letʼs get started…
1. ) Open RAW File In Adobe Camera Raw
In this particular example, Iʼve used Adobe Photoshopʼs – Camera Raw to make my initial raw file adjustments, but you could use whatever program you feel comfortable with such as Adobe Lightroom.
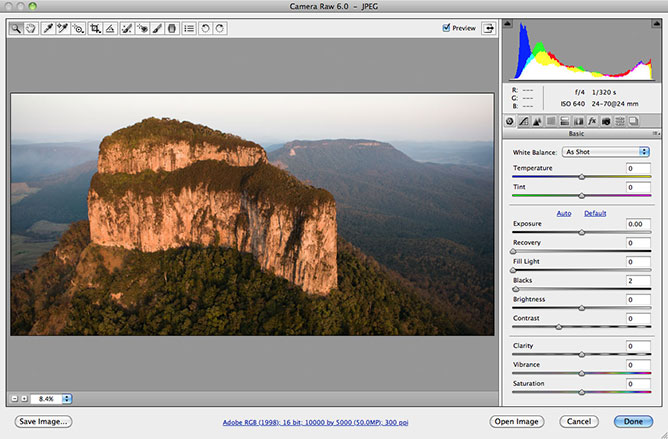

My aim here was to accurately reproduce the diffused September afternoon lighting I had experienced on the day. This resulted in a sound foundation from which to work on in Photoshop.
The final step after making all my adjustments in camera raw is to open the adjusted image in Adobe Photoshop.
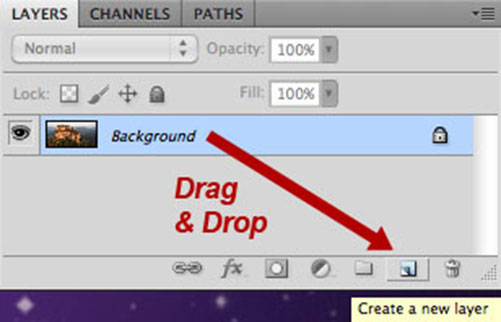
2. ) Duplicate Background Layer
Select Layer: Layer ➞ Duplicate Layer
Once the image was opened in Photoshop, I dragged and dropped my background layer on top of the “Create a New Layer” icon which in effect duplicated my background layer.

3. ) Apply “Local Contrast” Sharpening
Local contrast sharpening attempts to increase the appearance of larger areas of light and dark transitions, very similar to how sharpening with an “unsharp mask” increases the appearance of fine edges.
But, before I can apply this technique… I need to mask off the highlights within the photograph so not to blow them out past level 255 in the histogram.
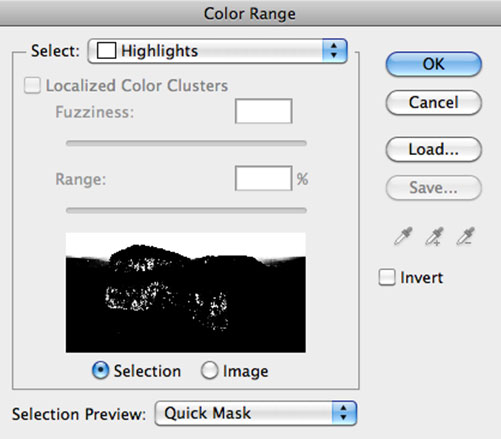
A. Select Color Range
Select → Color Range → Highlights
I used color range to isolate the highlights and make a selection. Color range is great for all kinds of purposes, but in this particular instance all I need to do is select hightlights from the drop down menu, make sure the checkbox below is set on “selection” and not image and then click OK.

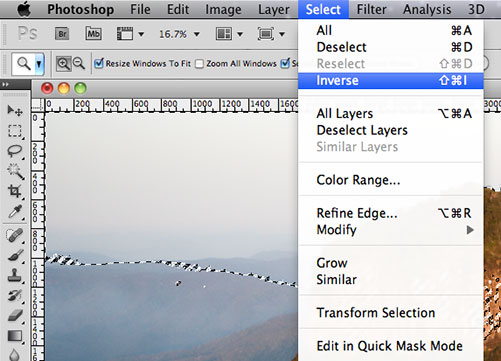
B. Inverse Color Range Selection
Select → Inverse
The next involves inverting the selection from highlight to mid-tone/shadow as these are the areas I want my sharpening to be applied to. To do this we navigate to select in the menu and click on “inverse”.

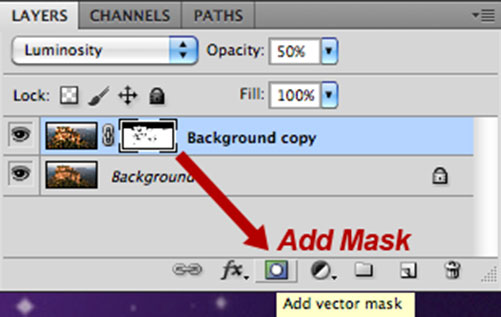
C. Add Layer Mask
Layer → Layer Mask → Reveal Selection
The final step involves adding a layer mask to our new background layer using the color range selection weʼve created by clicking the “Add Layer Mask” icon.

D. Apply Local Contrast – Part One
Filter → Sharpen → Unsharp Mask
The concept behind local contrast sharpening involves applying the unsharp mask at a very high pixel radius with a small percentage amount. I personally like to start with the amount value at 25%, radius at 100 pixels and the threshold at 0. This really starts to add depth to a photograph.
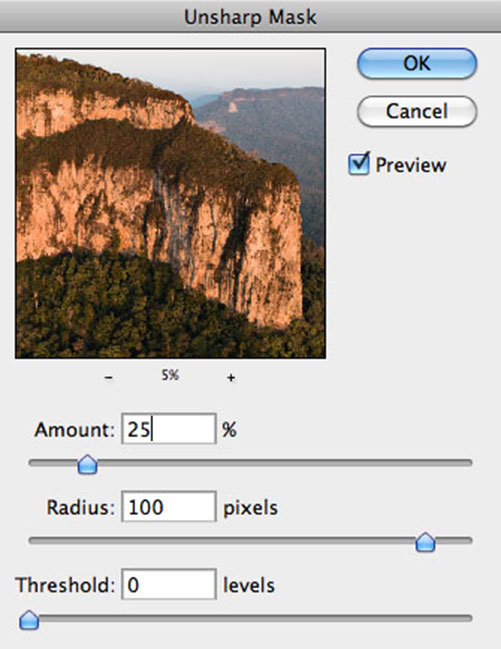

Now just be careful though to pay attention to the highlight values in the selection using your histogram. Because in some cases 25% as an amount may be to much and you may need to knock it back to between 10 – 20% in order to avoid blowing out the high mid-tone values in the masked selection.
E. Apply Medium Unsharp Mask
Filter → Sharpen → Unsharp Mask
At this stage, I want to reduce the radius of pixels to about 10 and set the amount percentage to somewhere between 25 – 50% and apply the unsharp mask again.
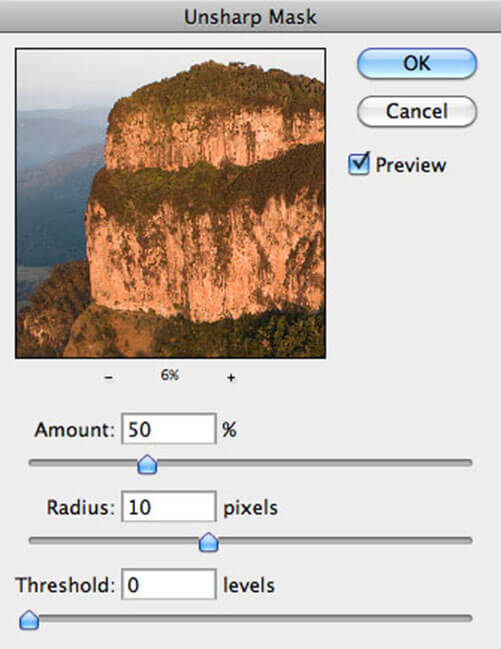
This is a form of cumulative sharpening where we start off large with the local contrast and begin to reduce the pixel radius.
F. Apply Small Unsharp Mask – Optional
Filter → Sharpen → Unsharp Mask
This stage is optional and depends on whether any sharpening has been applied during camera raw processing.

I personally print my photographs up to 40 inches wide. Therefore I prefer to sharpen after I have interpolated my photograph to its final print size. This enables me to better control digital artifacts.
Please Note: The percentage amount should be visually adjusted according to the type of photograph you may be working with and personal taste.
4. ) Create Colored Gradient
Layer → New Fill Layer → Gradient
Because I was unable to capture this photograph after dusk when the earthʼs shadow cast creates an amazing array of colors, I needed to improvise.
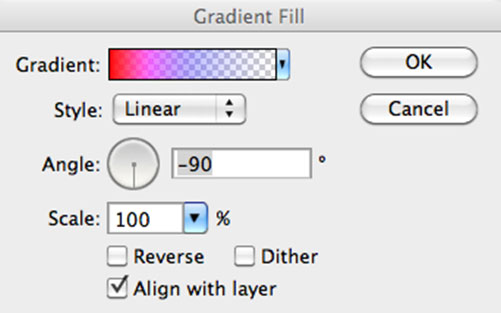

With an understanding of the color spectrum it is relatively easy to recreate in photoshop with a little bit of ingenuity.
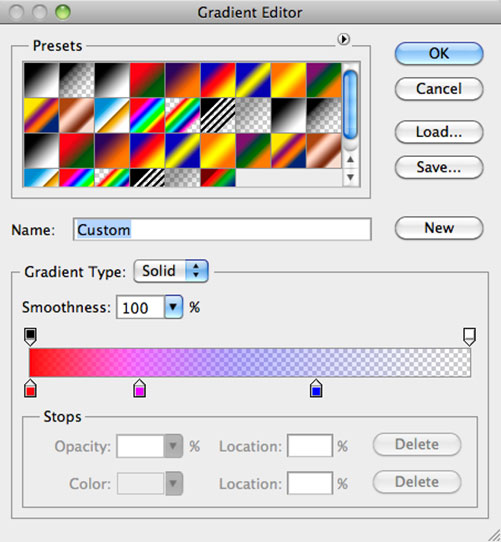

First I created a custom color gradient layer using the color values listed below. I then adjusted them accordingly to reproduce the effect of the earthʼs shadow.
5. ) Reduce Opacity
With such strong color values, I reduced the opacity of the color gradient layer until the color in the sky became visually pleasing.
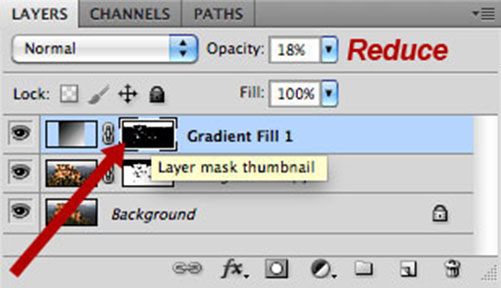

This method allows you the greatest control to within 1 percent. After some consideration I finally choose 18% as the final opacity value.
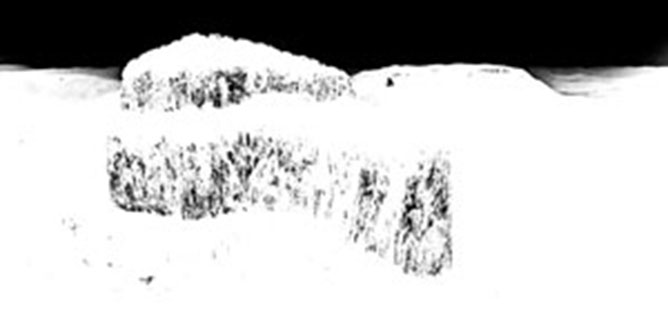
6. ) Masking Off the Sky
Select → Color Range → Highlights
The final step in the process of creating this color gradient was to mask off the areas within the image where I didnʼt want this gradient effect to be applied to.
I used color range to isolate the highlights and create a selection from which I could create a layer mask.
I then clicked on the layer mask thumbnail, holding down the alt/option key which in return displays the mask, enabling me to work on it.
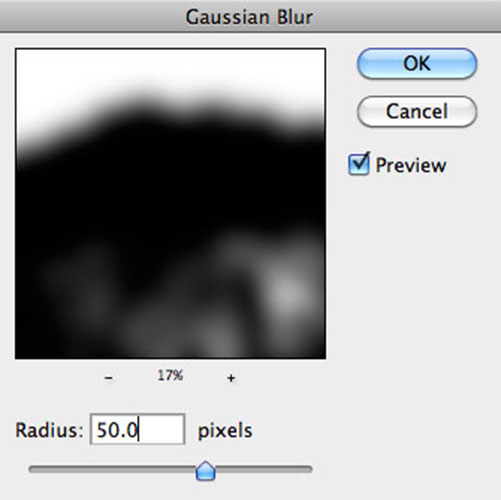

Filter → Blur → Gaussian Blur
Now instead of feathering the original color range selection, which would only effect the outer edges of the sky, I decided to soften the layer mask by applying a Gaussian Blur Filter with a radius of about 50 pixels.
Apply Gaussian Blur to layer masks is a simple way to take the edge of selections.
7. ) Add Levels Adjustment Layer
Layer → New Adjustment Layer → Levels
With the addition of the color gradient layer for the sky, I could see that the lower two- thirds of image required a slight density and color balance adjustment in the mid-tones and shadows to closer match the hues of the evening sky.
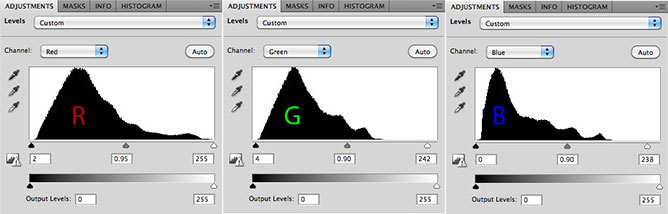

I therefore, created a new adjustment layer for levels and added a layer mask to exclude primarily the highlights and the sky.
8. ) Add Curves Adjustment Layer
Layer → New Adjustment Layer → Curves
After my levels correction, Iʼd noticed that specific tonal areas in the image had lost there vibrance with the addition of a magenta color balance shift.
Using a curves layer, I was able to target these areas using specific points on the curve, without effecting any other areas.
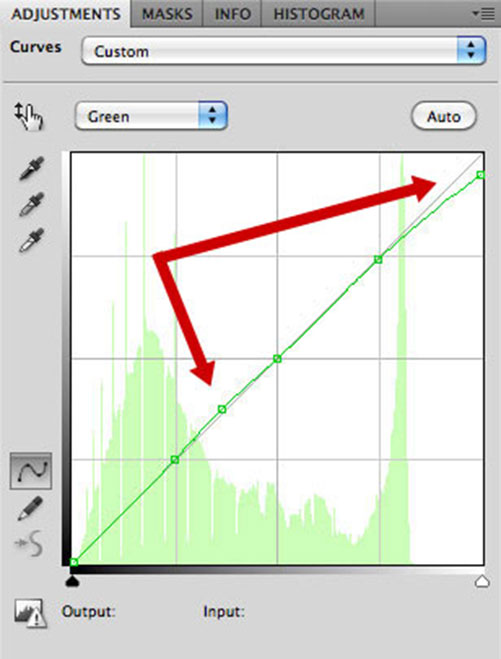

This allowed me to add additional units of green back into these areas. Itʼs a minute change, but it makes a huge difference visually.
9. ) Add Another Curves Adjustment Layer
Layer → New Adjustment Layer → Curves
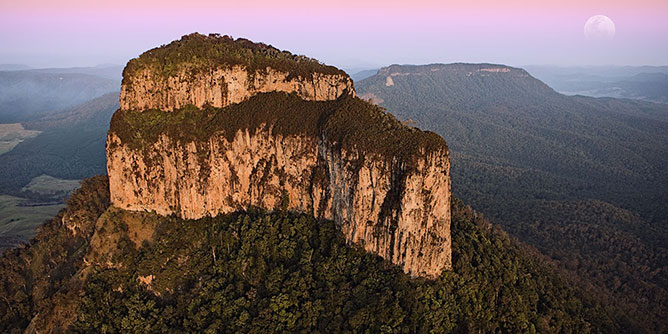
The highlight values located on the open cliff face of Mt Lindsey were sitting slightly to high. On closer inspection those values appeared unnatural to the eye as a result.
Therefore I decide to add a curves layer to target the highlights at the peak of the RGB curve and adjust the color balance by reducing the contrast of the blue curve.
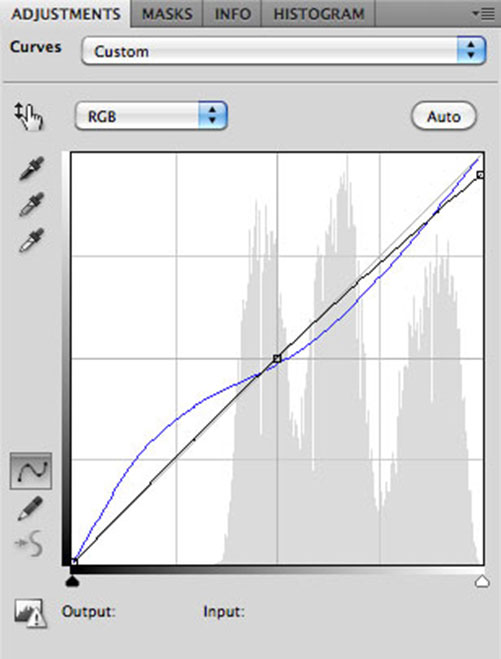
Whilst all the original values were within range, lowering them resulted in a natural sand stone finish.
However, I still needed to create a layer mask for the new curves layer to prevent the changes from effecting the highlights in the sky.
10. ) Add Selective Color Layer
Layer → New Adjustment Layer → Selective Color
Selective color is an amazing tool for any type of color balance adjustment, large or small. If you find that you need to make substantial color shifts, try changing the radio button in selective color from relative to absolute for more dramatic results.
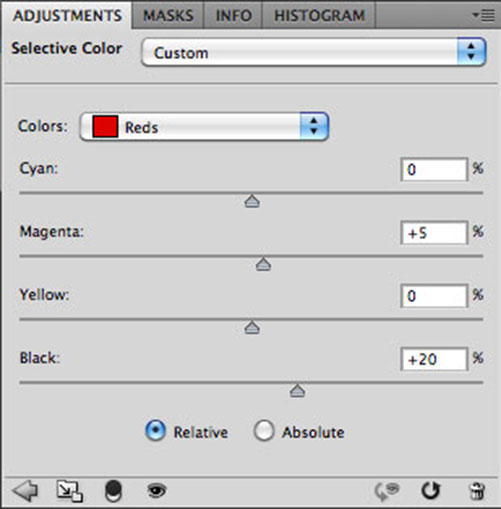

Here I made a couple of tweaks primarily to the red value, dialing in more magenta to remove the green cast and added black to increase the density. This created the hue and subtle glow of an early summer sunset.
11. ) The Preparation of the Moon
Unfortunately, the moon was not in the original photograph and in actual fact would never have been present at this angle, as this photograph is facing south, south-east.
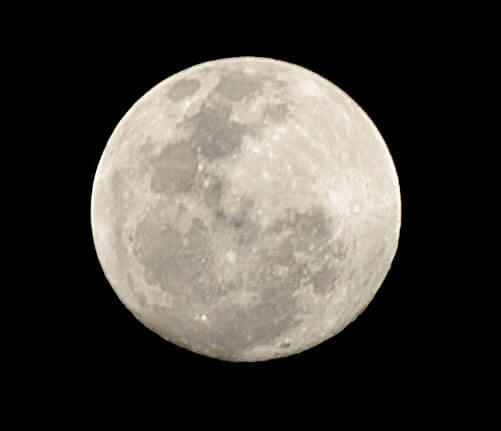

But personally, I think the addition of the moon is a nice touch that adds interest to the shot. I had photograph the moon a couple of months early for such an occasion.
In order to prepare the moon to be inserted into the main photograph, I have to first extract it.
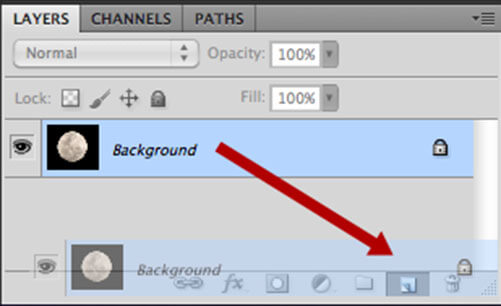
A. Duplicate Background Layer
Layer → Duplicate Layer
To begin, I duplicated the background layer by dragging and dropping it onto the “create a new layer” icon.

B. Select Moon Using Magic Wand
Magic Wand Tool ( Keyboard Shortcut – W )
I then choose the magic wand tool and clicked on the black night sky to create a marquee selection and isolate the sky from the moon.
C. Feather Selection
Select → Modify → Feather
Because the moon was photographed against the dark night sky, it leaves a dark outline around the edges of the moon, which would stand out clearly on a lighter background.
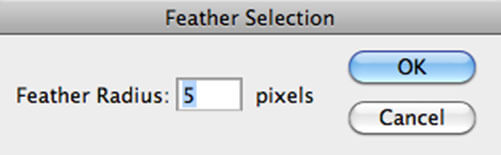

To solve this problem without getting to fiddly, I applied a feathering of a 5 pixel radius to the selection, which will in return softened the edges and gradually decrease the effect of the black outline.
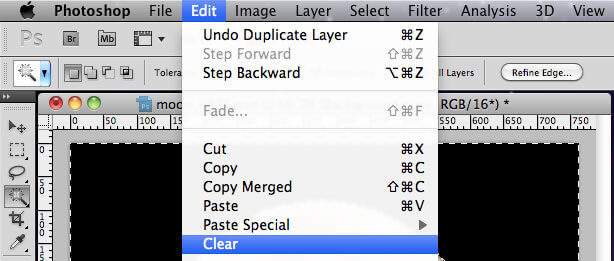
D. Remove the Night Sky
Edit → Clear
Next I need to remove the excess night sky from the background, so that all I was left with was the moon.
To do this I navigated to the menu and clicked on “Edit > Clear”, which in return deleted the selected area from the background layer.

To see exactly what Iʼd cut out, I needed to turn off the original background layer. What you should see next is something similar to the screenshot on the right.
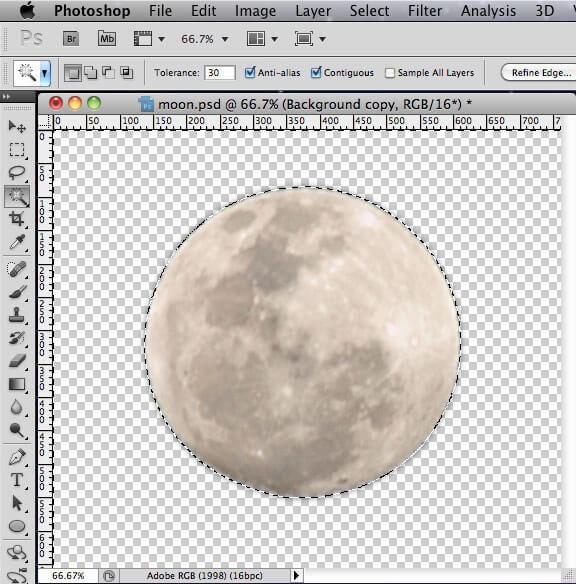

The end result is that I now have a moon ready to be inserted into the finally photograph.
12. ) Copy & Paste Moon
Edit → Copy – Edit → Paste
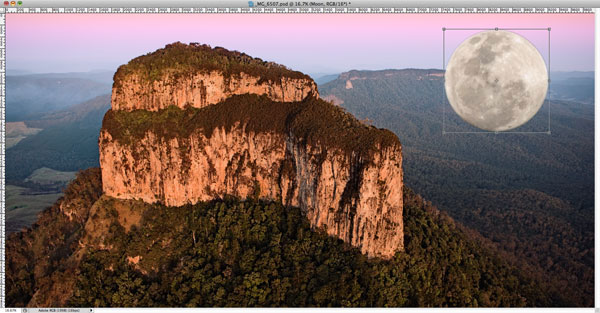
At this stage we want to copy the selected moon layer and paste it into the main photograph file.
Another alternative way to do this is to have both photograph files open, so that we can drag and drop the moon layer from the first file on top of the second file. Either way, they achieve the same result.
13. ) Free Transform to Adjust Size
Edit → Free Transform
Now depending of the resolution of the two files, you should see a difference in size. In this case the moon was obviously to large. Using the free transform tool I resize the moon layer to something more realistic.

Quick Tip: To keep the proportions the same when using the free transform tool, just hold down shift and that way you wont distort your image proportions.
14. ) Select Layer Blending Mode
Layer → Layer Style → Blending Options
What are layer blending modes? A simple explanation would be that layer blending modes enable layers to interact with other layers in different ways.
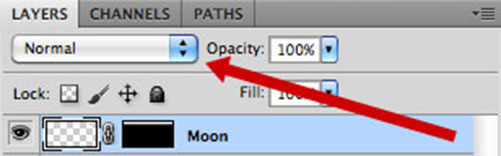


In this example Iʼm choosing to use the “overlay” blending option, which multiplies or screens the colors, depending on the blend color of the involved layers.

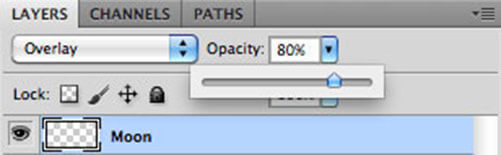
15. ) Adjust Opacity of Moon Layer
Layer → Layer Style → Blending Options
The moon was still visually quite bright in comparison to the rest of the landscape in the photo. To address this problem, I adjusted the opacity of the moon layer from 100% down to 80%.
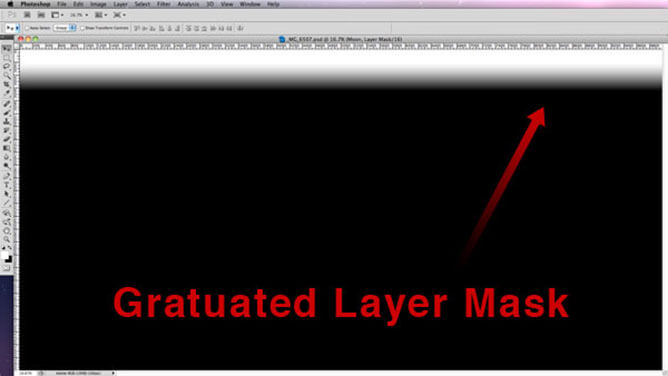
16. ) Add Blank Layer Mask
Layer → Layer Mask → Reveal All
The moon still looked slightly out of place in the graduated sky. I came to the conclusion that I needed to graduate the density of the moon.
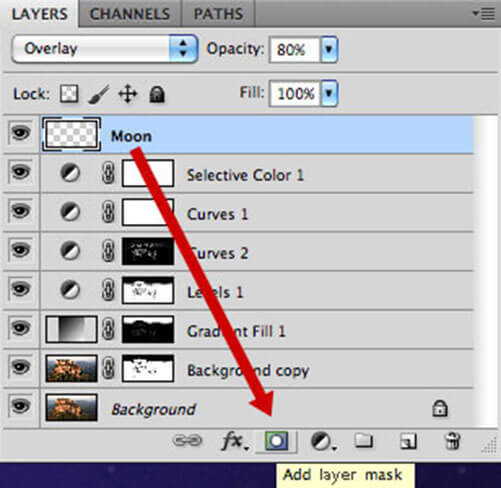

To do this I had to create a blank layer mask to which I could a add a gradient.
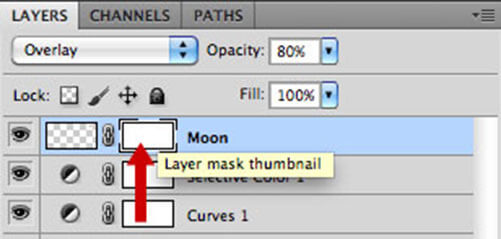

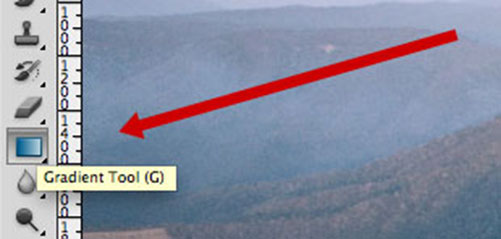
17. ) Using the Gradient Tool to Add a Gradient to the Blank Layer Mask
Gradient Tool ( Keyboard Shortcut – G )
I then proceed to first select the gradient tool from the tool bar and made sure that the gradient I was going to be using was pure white to black, left to right.
With the correct gradient set, I want to make sure that the gradient starts with white and finishes with black.


The color palettes in the tool bar, decide which color comes first, hence white is on top of black as highlighted in the screenshot to the right.
After establishing this fact, I zoom in on the moon making sure that the moon layer mask was selected.

Because I only wanted the gradient to be applied to the height of the moon, I needed to guide the gradient tool from the top outer edge of the moon to the bottom.
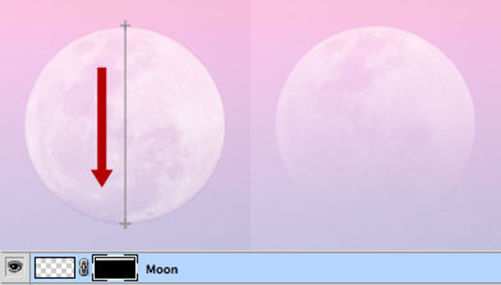

As you can see the gradient has been added to the layer mask and the moon has become graduated.
Conclusion
When I first started out in photography, I found it extremely easy to become overwhelmed with the amount of information I had to learn on everything from the science of photography right through to color theory and management.
As technology changed, the transition from film to digital seemed relatively quick in retrospect, although I still remember working of digital film scanners that would take an entire day to scan and render a digital file.
I began learning Adobe Photoshop when it was in version 4, with very limited functionality. Although most of the fundamental tools that were there then, still reside in the software today numerous versions later.
Technology has evolved to a point where nothing is impossible, but the fundamental principles of photography still remain the same. Itʼs these fundamental principles that are the keys to your success and will not only help you become a better photographer, but will enable you to see the world in a new light where photographic opportunities become endless.
Challenges Of Aerial Photography
The corrections I made in photoshop to this photograph were dramatic, but deemed necessary because of the difficulties I had encountered to capture this marvel which included:
- Vibrations of the aircraft during flight.
- Speed & angle of flight (45 degrees)
- G forces of the aircraft.
- Daylight hour flighting restrictions.
Because of the nature of where this photograph was taken, multiple reshoots would be almost impossible, time consuming and costly, but this is where photoshop can come in very handy.