In Photoshop there are numerous ways of converting color images to black and white, but which method offers the most control and will deliver the best results?
This is a question I’ve asked myself many times and consequently have spent countless hours experimenting with post processing techniques in Photoshop unable to make up my mind…
Here’s what I learnt, no editing technique is perfect. The approach you decide upon will depend on your style of photography and what you would like to achieve as an artistic outcome?
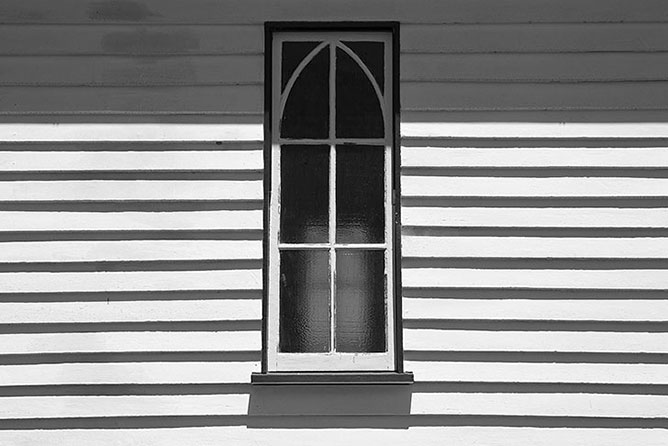
Black & White Conversion Techniques
Within this article, we’re going to explore five different approaches you could use for transforming color photos into dramatic black and white images.
Some techniques are simple, but others require explanation before you can truly appreciate their potential and why you would want to use them as part of your digital photo editing workflow.
1. ) Convert Raw Files To B&W Using Camera Raw
It’s not secret that when working with digital images you’ll achieve your best results by starting with the original, unedited raw file. Whilst these days most photographers edit their raw files within Adobe Lightroom there are those of us that only have available Photoshop.
Luckily, Photoshop comes with a plugin called Adobe Camera Raw (ACR) which offers similar functionality and features to Adobe Lightroom and has been built upon the same powerful raw processing technology.
If you’re in a hurry you might choose to simply desaturate your images by reducing the saturation slider found within the “Basic Panel” of Camera Raw. But, I wouldn’t recommend this method when you could use “HSL / Grayscale Panel” which offers far greater control.
By checking the “Convert To Grayscale” option you will be able to adjust the tonal range of any color by modifying the corresponding sliders value.
The only caveat is making sure that you don’t over work and emphasize the limitations of your digital camera’s sensor.
Bayer sensors for example don’t capture 100% Red, Green and Blue. Instead often only capturing 25% Red, 50% Green and 25% Blue which can make extreme edits difficult to execute without introducing chromatic aberrations and destroying the quality of your image.
2. ) Convert Color Images To B&W Without Camera Raw
So, now that we’ve looked at the raw processing options, how do you convert color images to black and white without using Adobe Camera Raw (ACR)?
I’m glad you asked, there are two options to consider… The first and perhaps simplest involves opening “Image / Adjustments / Black & White”, which I’m not going to recommend because I’m obsessed about quality.
I’ve always advocate for using “New Adjustment Layers” where applicable to preserve the most amount image information during the editing process, even though they increase file sizes.
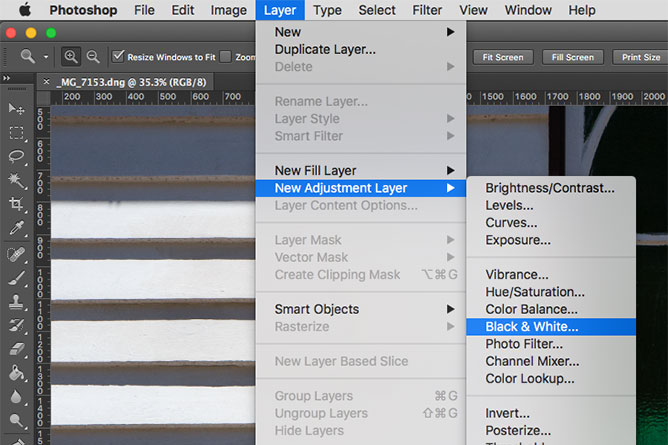
So, with that said I’m recommending opening “Layer / New Adjustment Layer / Black & White” which will added to your layers panel in Photoshop. If you don’t see your layers or properties tab you can go to “Window / Layers” or “Window / Properties” in the navigation to enable them.
In the properties tab you’ll find controls similar to the “HSL / Grayscale panel” within Adobe Camera Raw where each slider targets a particular colors tonal range.
In additional to custom controls you’ll also find set of preset filters that mimic the effects you would get from camera filters whilst shooting traditional black and white film.
There is also a click and drag modify icon which will allow you to edit your images by clicking on them, I personally don’t use this feature but that’s not to say you want find it useful.
If you wish to replicate those old fashioned sepia tone photographs from the 19th and early 20th century, tick the tint checkbox, then select the hue and saturation you would like to recreate for your images.
It’s that simple… The black and white adjustment layer in Photoshop can be quite useful for transforming those neglected color jpegs into dramatic shades of gray.
3. ) How To Desaturate Color Images In Photoshop
It’s worth quickly mentioning that Photoshop has an adjustment called Desaturate which does exactly that… It removes all color information from an image, leaving behind only its monochromatic tonal relationships.
So, What Is Monochrome?
Monochrome means only containing or using one color… So, whilst your image may appear to be black and white it still remains in RGB mode vulnerable to color casts which may or may not be intentional.
Desaturate is located under “Image / Adjustments / Desaturate” in the main navigational menu and therefore can only be applied directly to image layers.

Desaturate is quick and doesn’t offer any creative controls. But, if you would like more control over desaturating your images don’t forget to take advantage of the Hue / Saturation adjustment. Simply reducing an images saturation levels and altering its hue can create seductive, monochromatic images.
4. ) Convert Color Images To Grayscale
As you may or may not know image files can be created, converted, edited and saved into different color modes which poses distinct color spectrums designed for specific purposes and outputs.
Color modes you might be familiar with include RGB and CMYK, however you might not of heard of Bitmap, Grayscale, Duotone, Indexed Color, LAB Color and Multichannel. But the color mode we’re interested in exploring is Grayscale.
So, What Is Grayscale?
Grayscale mode converts all colors of your image into shades of gray. For an 8-bit image there can be up to 256 shades of gray ranging from 0 (black) to 255 (white).
Grayscale values can be also measured as percentages which can be very helpful when working with Ansel Adams zone system and/or inkjet printing where the percentage values correspond to the amount of black ink output onto the surface of the paper.
The process of converting an image to Grayscale is relatively straightforward and only involves changing from RGB Color to Grayscale via the navigation menu (Image / Mode / Grayscale) within Photoshop.

The biggest disadvantage to using Grayscale mode is that you will be required to “Discard Color Information” and therefore that information will never be available to you again, unless of course you return to the raw file.
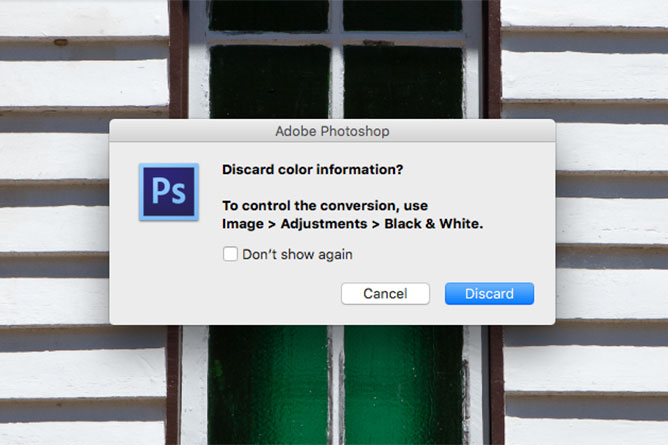
If the thought of never being able to access your original color values throughout the editing process scares you, then you’ll most likely want to avoid converting your images to Grayscale in Photoshop.
5. ) Convert Color Images To LAB
The last method I’d like to discuss involves converting your image to LAB mode. But, what exactly is LAB and why would you choose to use it over the other methods I’ve already discussed?
The CIE LAB color model is based on the human perception of color and it’s numeric values describe all the colors we are capable of perceiving with the human eye.
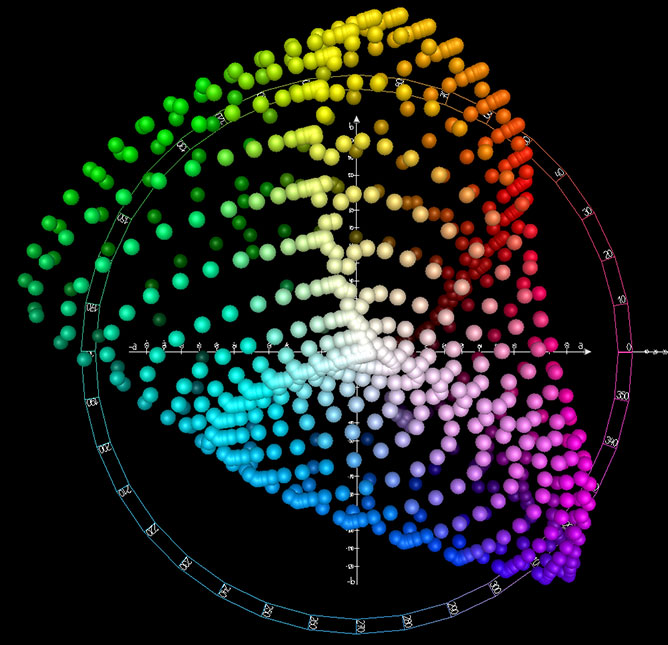
Image By Holger Everding
Considered to be device-independent, color management systems use LAB as a reference point for predictably transforming color from one color space (such as RGB or CMYK) to another.
The word “LAB” is an abbreviation for its three different dimensions, L axis controls lightness (0-100), A axis controls red (+128) to green (-128) and B axis controls blue (+128) to yellow (-128).
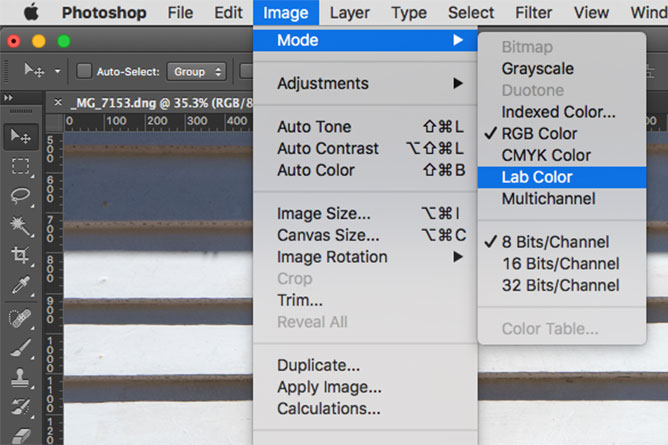
But because we’re merely concerned with converting images to black and white, I’ll only be discussing how to work with the L axis or Lightness channel which contains all of your images detail, minus its color information.
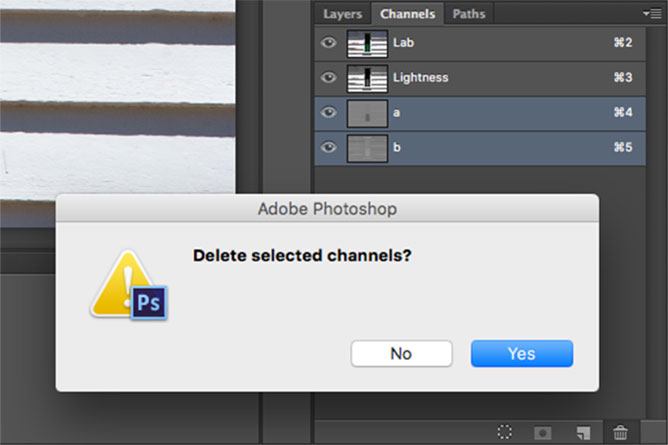
If you go to the channels panel and delete the A and B channel, all that will remain visible is a black and white image ready for post processing.
So, Why Convert To LAB Color Instead Of Grayscale?
Well, Grayscale converts the color values into shades of gray (including all colors), whereas the Lightness channel of LAB only displays the luminance values and therefore delineates tonal relationships with precision and clarity.
But, I’ve found it’s biggest benefit to be the elimination of any potential imperfections that occur from incomplete information captured by digital cameras with bayer sensors (as discussed earlier in this article).
Unfortunately, LAB files aren’t that user friendly when it comes to sharing or printing your photographs. Therefore, you will be required to convert your images back to Grayscale mode, before you’ll be able to save your images in a compatible file format ready for output.
In Conclusion…
We’ve now walked through five different ways to convert color photos into black and white in Photoshop.
Each technique that we’ve discussed have positives and negatives, but hopefully my commentary has helped you decide which technique would best suit your existing digital workflow.
If you have any further questions, please don’t hesitate to leave them in the comments of this blog post and I’ll do my best to answer your questions as promptly as possible.


Good Afternoon Annabella;
I just stumbled across your online content today for the first time. I read your piece on why FB is generally not good for a photographer’s business. I thought it interesting, however, I am just getting to the point of trying to market (sell and draw attention) to my photo work, and just joined FineArtAmerica.com, who heartily recommends utilizing FB to promote and expand name and brand recognition as a collateral tool. I also see that with the exception of an article posted in December 2018, you have not had much to say.
Are you still sharing opinions on matters photographic, and if so, what say you now with regard to the creation of a FB presence as a separate entity from any personal FB account one may have?
Any other thoughts or insights … advice, etc., etc. would be appreciated. I am also considering WORDPRESS as an avenue towards building a web-presence.
Any and all feedback will be appreciated. Hope that all is well, and your afternoon pleasant.
Thanks for your time.
Jay Sigal
Elyria, Ohio
Thank you for your comment Jay 🙂
Yes, I know I haven’t been very active of late, however I plan on publishing more content in the coming months and offering my opinion on all things photographic. Regarding facebook, I believe you need a presence because it’s a valuable marketing tool, however I would never rely solely upon it as your only communication channel. Remember you have no control or ownership over your presence on facebook or any other social media channel for that matter. Building a website (utilising wordpress) in conjunction with an email list is a valuable asset that can be leveraged.
Feel free to share any ideas or topics that you’d like covered in upcoming video tutorials and articles?