Today you are going to learn how to take relatively ordinary photos and turn them into something spectacular using Photoshop, all within the next 7 minutes.
Now for today’s challenge, I’m going to be using Adobe’s Camera Raw plugin which you’ll find inside Photoshop and we’re going to be working on a raw image file.
If don’t have any raw files, don’t worry because you can still use Adobe’s Camera Raw to edit your jpegs or tiffs by simply right clicking on a chosen image inside of Adobe Bridge and selecting “Open in Camera Raw…”
There are so many features and tools in Camera Raw that it can sometimes be hard to know exactly what to use, especially if you’re not familiar with the interface.
So instead of giving you my long winded, raw workflow formula, which could take up to half an hour, I’ve decided to pick out the best bits and show you a couple of tools that I used to transform this image into something worthy of attention.
We’re going to focus on three specific features in this video, the “graduated filter tool, the lens correction panel and vibrance and saturation sliders”. So let’s go ahead and get started…
Graduated Filters
Now because this image has little color, the first adjustment I’m going to make is to add a couple of colored graduated filters, one for the sky and one for the foreground to not only draw focus to the center of the image, but also to impart color that’s currently lacking from this image.
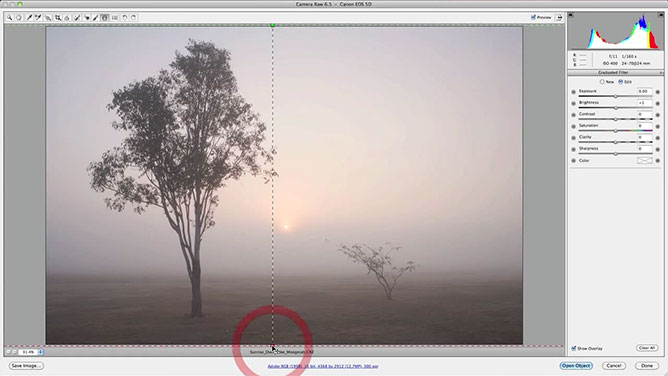
So you’ll find the graduated filter adjustment located in the tools menu or as a shortcut you can press “G” on your keyboard to select it. Once selected you’ll notice you have an entirely new panel and set of adjustments on the right of your workspace.
I’m going to proceed and add a graduated filter starting at the top of the image and dragging it right down to the bottom of the image. Now this will be primarily for the sky.
I’m going to adjust the “brightness” slider to -150 and then set the a “color” hue of 298 with a saturation of 50 percentage.
So Next, I’m going to do the reverse and add a graduated filter starting at the bottom and working my way to the top of the image with the intention of darkening the foreground.
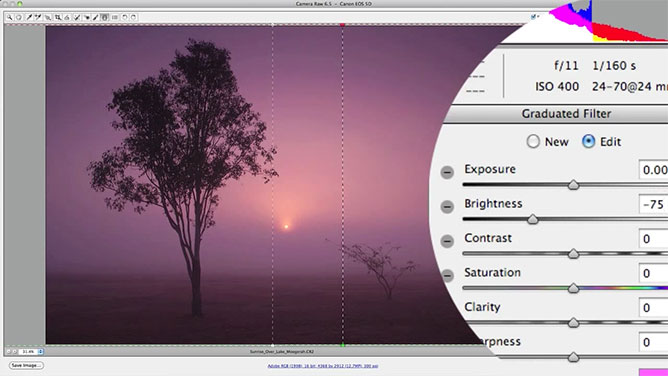
So let’s go ahead and adjust the brightness to say about -75 and then add a high contrast value of 100 to emphasize the trees as a silhouette.
Lens Corrections
The second key adjustment I’m apply is a “Lens Correction”, this is not only for correcting imperfections in my lens but also for emphasising lens vignetting to draw more focus the center of the image and the sunrise.
Lens Corrections is the 6th panel icon in from the left and within lens corrections there are two tabs profile and manual. In the profile tab I’m going to enable “Lens Profile Corrections” making sure that my camera model, and lens profile are selected.
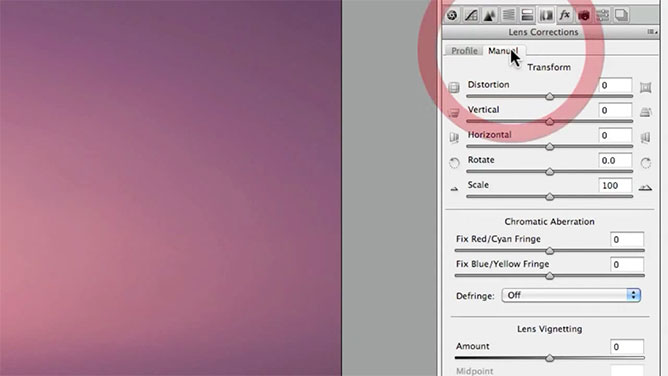
Then I’m going to quickly jump over to the manual tab and where if you scroll to the bottom you’ll find lens vignetting. By adjusting the amount slider to -100 and the midpoint slider to 25 I’m drawing even more attention to the highlights of the sunrise.
Vibrance & Saturation
Now the third and final key adjustment is to fine tune the color and saturation settings of the image. So first, in the Basic panel, I’m going to dial in about +50 units of saturation to give this image a little bit of life. I’m also going to enhance the lower saturated colors by adjusting the vibrance slider (+25 units).
Now if the color relationships in your image don’t quite look right, you can refine them by going to the “HSL or Hue, Saturation and Luminance” panel.
In this example I’m going to reduce the orange and yellow hue sliders to about -25 to produce a richer sunrise without effecting the cooler hues.

(Sunrise Over Lake Moogerah, QLD Australia)
Although I wasn’t able to include my entire raw workflow in this video, I think you would agree that the results achieved from three small changes are impressive to say the least.
But having said that it’s important to remember, that changes made in Camera Raw are non-destructive and aren’t permanent, which means you can return and re-edit your images at anytime… So aim to make as many corrections as possible inside of Camera Raw, prior to opening your images in Photoshop.
If you approach raw conversions with this in mind, you’ll extract and preserve an image of the highest quality.


Share This Post With Your Friends...
Share the post "How To Edit Raw Images In Photoshop"