As you start to become more advanced with your photoshop skills, you’ll undoubtably begin to create selections and layer masks on a consistent basis and depending on the type of adjustment you intend on performing your selection may need refining to better suit the outcome you are trying to achieve.
When I referred to the refinement of your selection, I’m really talking in terms of definition and how sharp the outer edge of your selection will be.
In most cases when editing images you want your adjustments to be seamless, blending into the photograph which is why you’ll need to soften the edges of your selections on occasions.
There are a variety of ways you could achieve this desired effect, but in this tutorial I’m going to demonstrate the simplicity of photoshop’s feather adjustment.
Setting The Scene…
Before I begin, I think it’s key to quickly highlight that in order to use the feather adjustment you need to first have an active selection.
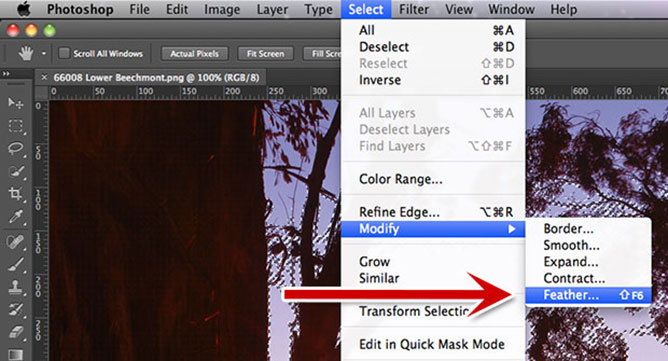
The feather adjustment is located under “Select > Modify > Feather…” or your can use Photoshop’s keyboard shortcut and press “Shift + F6” to bring up the adjustment window.
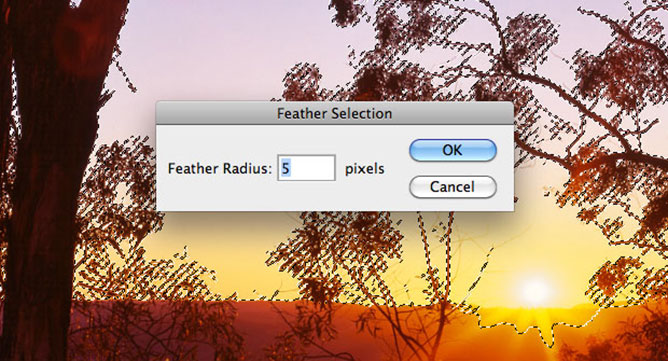
Feather Selection Options
As you can see there aren’t a lot of options when it comes to feathering, so the decision making process is quite straight forward and perhaps the only question you need to ask yourself is how many pixels will be required to soften my selection?
What Feather Radius Should I Use?
The answer to this question will vary depending on the resolution of the digital image you are editing, the selection you are making and the type of adjustment you are going to perform. Whilst this answer isn’t very helpful, it’s true none the less.
However, here are several starting points which are based loosely on certain situations that you may come across in your editing.
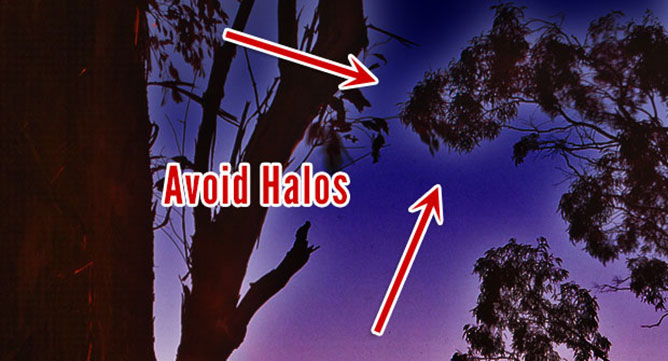
The key to remember is that you want to try avoid edge halos at any cost. An edge halo is the effect you’ll see around the outer edges of your selection or layer mask where it becomes considerably noticeable that you’ve adjusted the image and edge halo’s look very similar to graduated highlights or the effect you get when you over sharpen edges for example.
Resolution Based Feathering
LOW RESOLUTION IMAGES (1,000 pixels or less) will require a small feathering radius (under 10px), particularly images sized and saved for the web would fall into this category, along with selections that contain a high degree of fine detail.
MEDIUM RESOLUTION IMAGES (1,000-3,000 pixels) can accept a slightly larger radiuses of 10 pixels maybe more, before your adjustments become noticeable and is best suited to small to medium size prints.
HIGH RESOLUTION IMAGES (3,000+ pixels) will need feathering radiuses that are far greater and will vary depending on your desired adjustment, this can be anywhere from 10 pixels to 100 pixels and in some extreme cases I’ve used up to 250 pixels for specialized techniques, but that’s for a whole other discussion.
Although feathering is quite straight forward, applying it practically in relation to a specific situations may require a little experimentation at first, but it won’t take very long before you get the hang of it.


Share This Post With Your Friends...
Share the post "How To Feather Edges In Photoshop"