Now, it goes without saying that to be truly successful in photography, one must master the art of exposure or at least have a fairly good understanding of how it all works.
The exposure is the foundation on which your entire photograph is built, so you want to make sure that you get it right from the beginning.
Lucky with all the advances in digital technology achieving a reasonable exposure isn’t terribly difficult compared to traditional film.
Although having said that digital photography captures light in an entirely different manner than that of film and in this series of articles I’m going to reveal a few advanced techniques for achieving better exposures.
Expose To The Right…
The trick to capturing a good exposure when shooting in raw format, is to use a technique often referred to as “Expose to the Right” which you’ve probably heard of before.
If not, don’t despair, it simply means keeping your exposures to the right of your digital camera’s histogram, without blowing out your highlights …and whilst this is true, most photographers forget one important aspect…
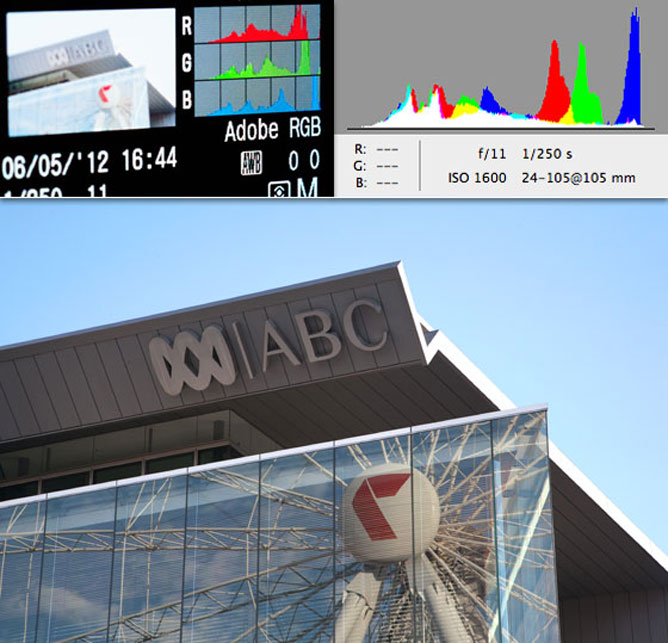
And that is… what you see in the histogram on the back of your digital camera does not accurately represent the information captured in your raw file. And as a result, you may actually be doing more harm than good.
Unfortunately what your actually looking at is a processed version of your raw file using your camera’s default JPEG settings, which can be very misleading, presenting highlights as blown out, when in actual fact, they’re not.
As a result, we’re left in the dark, not knowing whether we’ve underexposed… or overexposed our photographs, utilizing the entire dynamic range of our digital camera.
What Can We Do To Achieve More Accurate Exposures?
The answer… is a simple exposure test under your favourite lighting conditions, which will help to establish your camera’s exposure capabilities and guide you in the right direction…
But before I show you examples of what I’m talking about, I’d like to first explain the benefits behind why you should overexpose your raw files to the right of your histogram.
Perhaps the biggest difference between shooting film and shooting digital is the way these two different mediums respond to light. Film reacts very much the same way as our eye’s do in a non-linear fashion, distributing light evenly across all values from light to dark.
Where as digital camera sensors, capture light in a linear fashion…. where each step in tonal scale is not equal in value…. In fact, each step actually doubles in value as you move left to right, across the scale and it’s not until a gamma curve is applied that these steps become evenly distributed across all values, similar to film or the human eye.
Dynamic Range
Digital cameras capture light in 12, 14 and even 16 bits of information, which may sound all technical… But, it’s just a fancy way of saying how many levels of information can be captured by your digital camera sensor and stored within each raw file.
An example of this would be a standard 12-bit digital camera and when you times 2-bits by the power of 12, you end up with a camera that is capable of capturing 4,096 levels of information… for you to work with, unlike a standard 8-bit JPEG… converted in-camera, which only contains 256 levels of information (0-255).
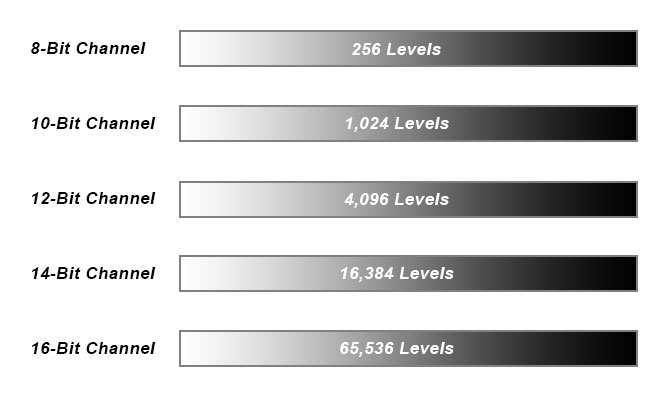
If we continue to use this example, you’ll notice the largest area of information capture is on the right and contains 2,048 levels and then the next step contains 1,024 levels and then the next 512 levels and so on.
Its because of its linear nature that digital camera sensors capture most photons in the highlights, which is why you want to expose your raw photos to the right of your histogram and avoid the unsightly introduction of digital noise into your shadows due to poor exposure.
Because of this fact, raw files have an amazing ability to be able to recover highlight information, especially when using a raw converter like Adobe’s Camera Raw or Lightroom, which can in some cases recover as much as one stop of highlight detail, which is no small feat in and of itself.
As I Mentioned Earlier…
In order to better understand the capabilities of our digital camera, the first thing we need to do is an exposure test which will identify exactly how far we can push our exposures without losing detail in the highlights.
Raw files have an amazing ability to be able to recover highlight information, especially when using a raw converter like Adobe’s Camera Raw / Lightroom which can in some cases recover as much as one stop of highlight detail, which is no small feet in and of itself.
But one of the risks associated with overexposure, especially when pushed to far… is the uncertainty of not knowing whether or not you have blown out the highlight values in your photograph.
In order to better understand the technical capabilities of our digital camera sensors, we need to take this technique “exposure to the right” one step further and introduce digital camera exposure testing and calibration.
Digital Camera Exposure Testing & Calibration
So, let’s now dive straight in and setup an expose test together…
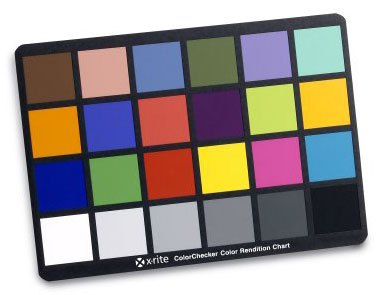
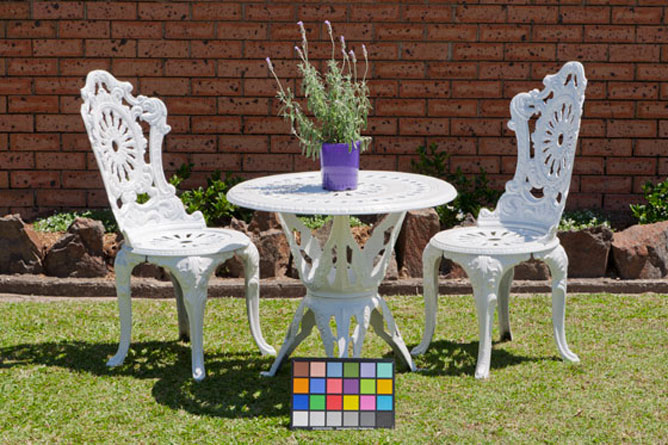
For those of you following at home you are going to need some sort of color calibration chart. If you don’t have your own chart, not to worry they’re relatively inexpensive and they come in a variety of different sizes to choose from. I recommend that you invest in a X-Rite color checker chart which you can easily pick up on Amazon.
Now, the first thing you want you to do after acquiring a color calibration chart, is to place your digital camera on a tripod under the lighting conditions you wish to test, this could be anything from natural light in the early morning, midday or late afternoon, through to studio lighting. Ultimately, it would be nice to test a variety of different lighting conditions & color temperatures, but what ever you can manage to start off with, is fine.
Also make sure you have a note book handy as you’ll want to take notes… This is important because we need to establish some “controls” for your test eg. light meter readings and exposure settings based on your chosen lighting conditions. So don’t forget to write your settings down.
Key Point, Not To Be Forgotten…
One thing to take note of when adjusting your digital cameras settings is that the ISO will effect the dynamic range of your photographs, as you can see on this graph ISO 100 has a larger dynamic range than that of ISO 1600 indicated by the Ev value. So make sure you choose an ISO setting that you’re most comfortable with shooting often.
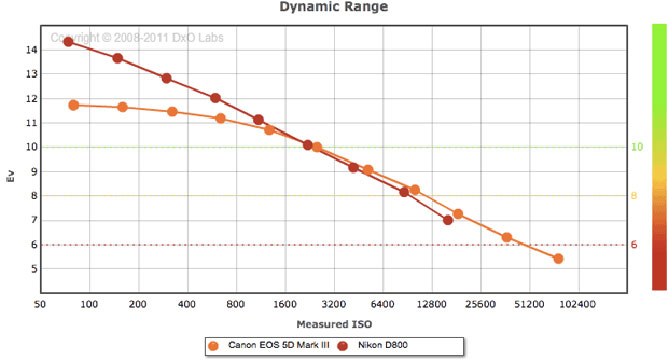
(Credit: DxO Labs)
Nothing Special…
In this example, I’ve setup a high contrast situation in the middle of the day, when the intensity of the sun was at its strongest. Now the photograph itself is nothing special, but it’ll do the job and work just fine for this particular demonstration.
The reasons behind why I chose this particular subject matter is that I wanted to included highlights of an extreme nature. The white garden chairs and table offer intricate detail and a high gloss finish which make for a great test subject.
Digital Camera Settings
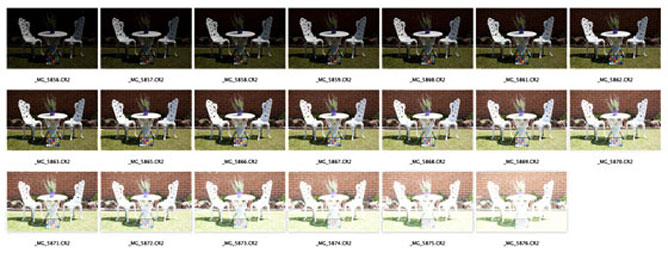
Now that I have my shot setup, I then proceed to bracket my exposures in thirds of a stop (three stops under and three stops over). When adjusting your exposures make sure to only adjust your shutter speed as we don’t what the depth of field in the image to change.
Compare & Contrast
After completing your bracketed exposures, it’s time to jump on the computer to compare results.
This process involves uploading your images to your computer, so that we can now test them using a raw converter such as Adobe’s Camera Raw Plugin or Lightroom and by test I mean that you want to find out how far you can over expose an image before you can’t recover anymore highlight detail and information using the exposure and recover sliders inside of your raw converter.
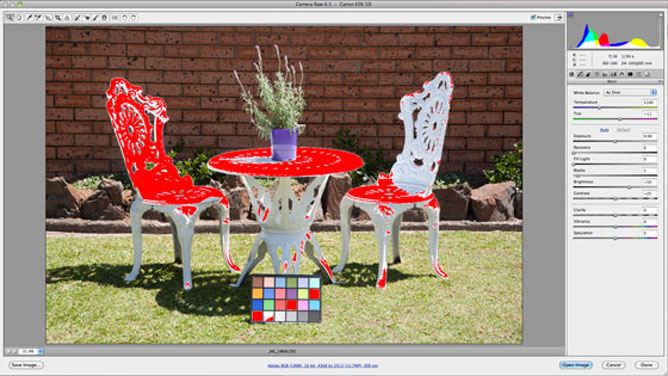
Now this process may take you half an hour but once you have established the perfect exposure it’s time to compare its histogram to the JPEG preview that you see on the back of your digital cameras display.
Upon analysis of your digital cameras histogram you’ll find and established a solid reference point for future exposures when shooting under similar lighting conditions to that which your initial test was photographed.
Now you’ll be able to compensate and adjust your camera settings accordingly to reproduce the perfect digital exposure for a raw file time and time again.
I hope you enjoyed reading this article, I’d love to hear your thoughts on this topic so please leave a comment below and show your appreciate by sharing this article with your friends.


Share This Post With Your Friends...
Share the post "How To Get Perfect Exposure Using Your Histogram"