In this article, I’m going to show you how to create a spectacular panorama using a tripod, multiple exposures and photoshop.
The image I’m going to be working with today was photographed in a small town called Akaroa (75 kilometers east of Christchurch) on the South Island of New Zealand.
Settled by the French in 1840, Akaroa is a charming and perfectly suited to capture the imagination of any aspiring photographer. Directly across the road from my accommodation is the sheltered harbour in all of its splendour and glory.
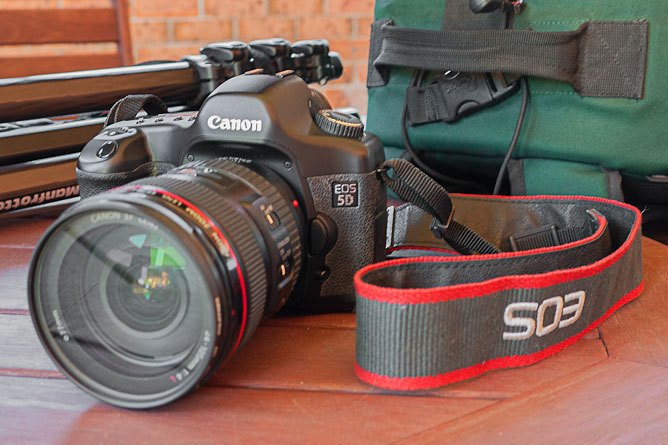
Whilst on holidays, I had my Canon 5D, Canon EF 24-105mm f/4 L lens, Manfrotto tripod and Lowepro backpack.
To create my panorama, I started by capturing eight individual exposures (portrait format) that generously overlapped each other. Because I didn’t have any panoramic equipment with me, I wasn’t able to rotate the camera around the nodal point of the lens.
Therefore, I decided to shoot using a longer focal length (82mm) to reduce potential stitching problems that occur at wide angles when not rotating the lens around its nodal point.
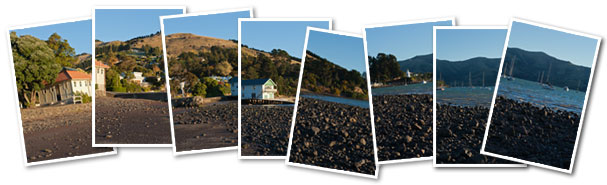
I had visited Akaroa in the middle of June which meant the afternoon sun was quite low in the sky due to the approaching winter solstice. I only had a short period of time to capture all nine exposures and avoid any potential change in light quality or shadows length.
Not to mention, I had to avoid motion blur and freeze the sailboats that were floating in the harbour by shooting at an appropriate shutter speed.
The majority of images were shot at F/11, 1/60 sec at ISO 200.
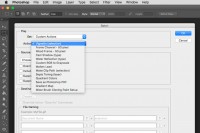
Once captured, I proceed to open all images within Adobe Photoshop’s Camera Raw plugin which uses the same raw conversion engine as Lightroom.
It’s entirely up to you as to whether or not you use Camera Raw Plugin or Lightroom to edit your photos, as they’re similar in many respects.
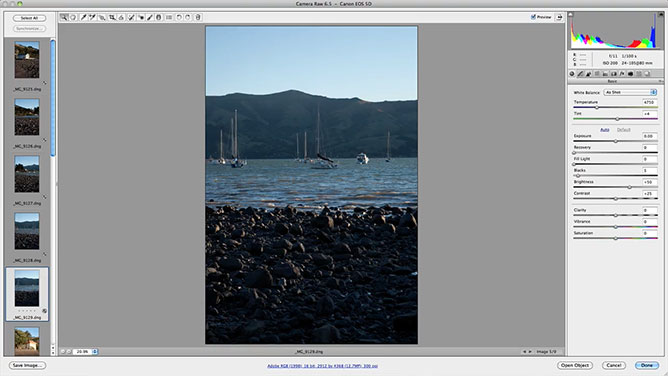
When post-processing I like to perform the majority (if not all…) of my editing within the Camera Raw Plugin to take full advantage of the information that is contained within the 12-bit raw image.
Before I can seamlessly stitch together all of the photos within Photoshop, first I need to edit each image and make sure that the densities all match.
Even though they were all shot using the same exposure there are still slight variants of around a third of a stop due to the wide angle of coverage and fading afternoon light.
So, how do I ensure each frame has the correct density? I used the “Eyedropper Tool” to sample values found in the blue sky of each image and then used those statistical values as a guide for making density adjustments.
Camera Raw Adjustments
I made several adjustments within the camera raw plugin and have listed them for you below:
- Exposure Slider – I made slight density corrections based on the digital camera’s original exposure and the RGB values obtained from the clear blue sky of my control image.
- Recovery Slider – The highlights found on lighthouse and sailboats were pure white and initially blown out. Therefore, I decided to increase the recovery slider to 100 which may come across as extreme, but was required to pull the highlights back into an acceptable range.
- Hue, Saturation & Luminance – I wasn’t overly happy with the aquas within the images and therefore decided to increase their saturation levels using the HSL panel.
- Lens Profile Corrections – To reduce imperfections created by the 24-105mm lens and improve the overall quality of the stitching process, I felt it was important to enable lens profile corrections.
- Sharpen Panel – It was essential to apply a small amount of sharpening (40 units) to strengthen and guarantee definition within the final image.
- Noise Reduction – I wasn’t expecting to have any issues with noise when considering all images were photographed at ISO 200. However, I wasn’t entirely happy with the amount of color noise I found within the shadows and therefore I added 25 units to the color slider within the noise reduction panel.
- Custom Crop – Within Camera Raw (Version 6.5) there are limitations when it comes to sizing an image. At the time, I was only able to size my images according to a handful of preset resolutions found within workflow options. My intentions were to size all images to the final print height of 24 inches, but unfortunately the available sizes were just too small. To overcome this problem I used custom crop, not for the purpose of cropping but instead for resizing my images to 16 x 24 inches.
How To Stitch Photos Together Into A Panorama
Photoshop has a feature called “Photomerge” which is what we are going to be using today to stitch my photos together.
Photomerge was introduced in Photoshop CS, so if you have an older version of Photoshop I’m sorry but you’ll need to upgrade in order to take advantage of this feature.

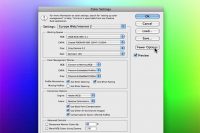
To open Photomerge you’ll need to go to Photoshop’s top navigational and click on “File / Automate / Photomerge”.
Within Photomerge there are two sections of concern “Layout” and “Source”.
Source as the name suggests is where you will select the image files that you would like merged together into one photograph. You can either add files that you already have open within Photoshop or select files that are located on your computer’s hard drive.
Once your file names appear in the dialog window… It’s time to customise our settings. There are three checkboxes below that you will either need to check or uncheck.
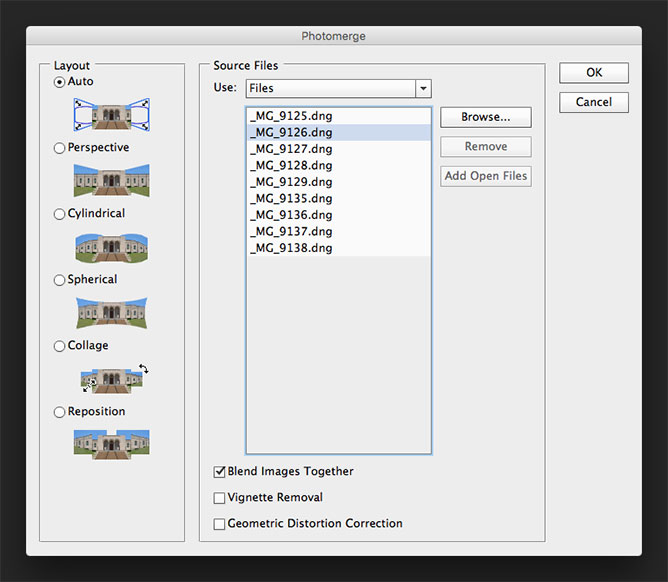
The first is “Blend Images Together” which finds the optimal borders between the images and creates seams based on those borders, and color matches the images.
With Blend Images Together turned off, a simple rectangular blend is performed. This may be preferable if you intend to retouch the blending masks by hand.
The second is “Vignette Removal” which removes and performs exposure compensation in images that have darkened edges caused by lens flaws or improper lens shading.
The third is “Geometric Distortion Correction” which compensates for barrel, pincushion, or fisheye distortion within images.
Photomerge Layout Options
Now beside “Source” is the “Layout” option which is how Photoshop will interpret your images. So, depending on how you photographed your panorama these settings can be very useful.
For example, if you used a wide angle lens instead of a telephoto lens your layout option would be different.
There are six layout options: Auto, Perspective, Cylindrical, Spherical, Collage and Reposition. I’ve chosen “Reposition” for my panorama, primarily because it aligns and matches overlapping content, but does not transform (stretch or skew) any of the source layers.
After clicking “OK” photomerge will begin the process of blending all my images together and below you’ll find my results.
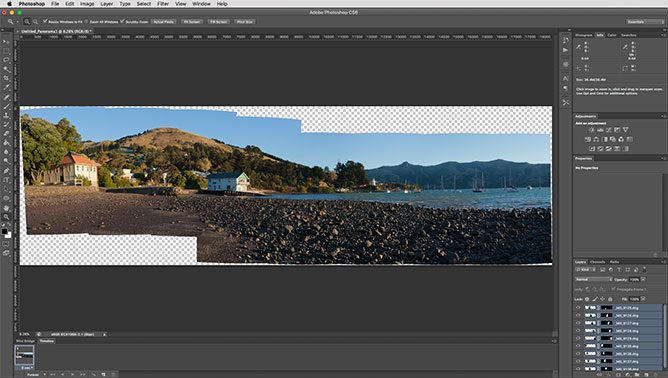
It’s almost impossible to identify where photomerge has stitched the images together, but if you wish to examine where each image has been joined, simply open the “Layers Panel”.
As you can see there are areas of the panorama that remain empty because that information didn’t exist within the images that I imported into photomerge and therefore I have two options.
The easiest option would be simply to crop the image, but personally I want to retain as much detail as possible, so I’ve decided to reproduce those areas of the image that are missing from the panorama.
I’m quite lucky because the areas that require work aren’t overly complex and therefore should be that difficult to correct.
How To Reproduce Missing Areas Of The Panorama?
In the olden days, I would have had to use the “Clone Stamp” tool for the majority of this work, but Photoshop has become so clever that this is almost not necessary any more.
1. ) Flatten image layers.
2. ) Select white areas using Magic Wand Tool.
3. ) Press “delete” on keyboard.
4. ) Fill dialog box configuration:
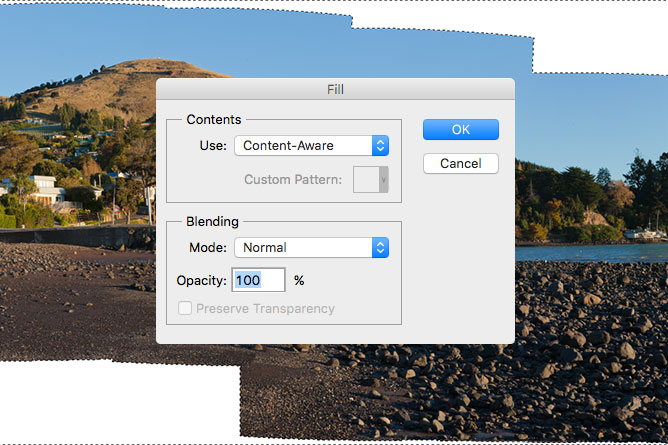
NOTE: If you’re working with Photoshop CC, Content-Aware Fill (for transparent areas) is now included within Photomerge and therefore you can skip this step entirely.
Refining Content-Aware Using The Clone-Stamp Tool
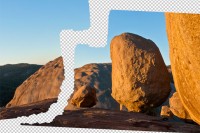
Final step in the process of creating my panorama is to correct any mistakes or inconsistencies that have been made by Content-Aware Fill.

First, I need to visually identify which areas require improvement. Then using the Clone-Stamp Tool, I select details within the image that would make an appropriate replacement.
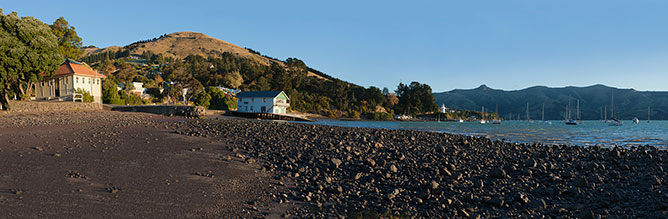
I hope you’ve found this insight into how to create panoramas using multiple exposures helpful and inspiring.


Share This Post With Your Friends...
Share the post "How To Make A Panorama In Photoshop From Multiple Photos"