As a photographer, one often finds the need to watermark their photographs to not only protect them from piracy, but to also help promote and market their business through the exposure a photograph might receive be that online or off.
Whether or not you choose to watermark your photos is entirely up to you, but even if the need never arises, the ability to create your very own watermark is definitely a skill set you should have as a photographer.
In this article, I’m going to first give you some simple ideas and examples on what type of watermark you should consider creating for your photos and why? … and then I’m going to walk you through how to make a watermark in Photoshop.
So, Let’s Go Ahead & Get Started
If you are going to watermark your photographs, the first question you should ask yourself is why? Now I know this question seems quick simple at first, but the reason “why” it’s often overlooked when it comes to actually creating a watermark.
What do I mean by this statement? Let me explain…
I think you would agree that the job of a watermark is to first prevent or decrease images from being stolen online and second the job of a watermark is to promote and market a photographers business… Agree?
If this is the case, why do photographers watermark their images with “hard to read” hand written signatures? Not that I have anything against hand written signatures, but in all honesty signatures of this nature are perfect for physical open or limited edition prints, not for online digital photos and here’s why?
If you want to achieve the promoting and marketing your business with your images, you need to have a watermark that’s easily readable, identifies your name and your website. Without a watermark of this quality you’re really only preventing theft, which don’t get me wrong is a good thing but doesn’t give you the biggest bang for your buck.
Enough said, let’s get started creating your watermark using Photoshop.
1. ) Watermark Concept

You need to start out by creating a solid logo or watermark that you want to place on or over your images and as I mentioned you want to keep it simple, easy to read and includes your website address.
Use the “Type” tool to create your text and if you only have a limited range of fonts to work with, don’t worry as you can download for free thousands of different fonts by visiting www.dafont.com.
When you find something you like, simply install your chosen font by copying and pasting it into Photoshop’s font folder or if you’re on a Mac use “Font Book” to manage your fonts across all applications. Font Book comes already installed on your Mac computer.
If you’re on a PC, copy your new fonts into the directory listed below:
C:Program FilesCommon FilesAdobeFonts
2. ) Design Fundamentals
As you begin to piece together your watermark, make sure you only use solid whites, shades of gray and perhaps even black, but in most cases stick to using just white, I’ll explain exactly why shortly.
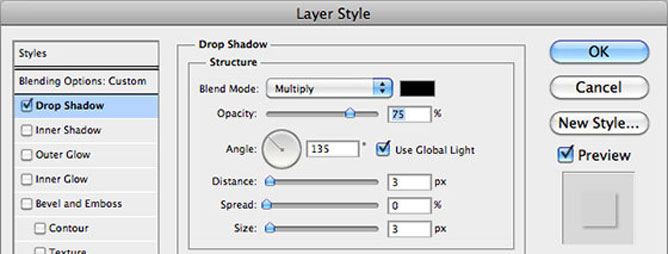
3. ) Blending Styles
One way of giving your watermark dimension is to add blending styles to your layer. These are simply effects such as drop shadows, bevelled edges and gradients for example that can really make your watermark look professional.
4. ) Copy & Paste
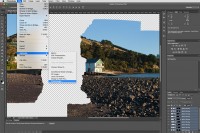
Once you’ve finish with the design of your watermark, it’s time to test it out on a real image. So go ahead, copy and paste your watermark onto another image and position it accordingly.
5. ) Sizing & Placement
Obviously, you need to decide on the size and placement of your watermark. Will it be placed in the middle of your image or in one of the corners. If it’s placed in the middle should your watermark be larger than if you were to place it in the corner of the image.
So, you need to decide on the size of your watermark, paying particular attention to making sure it can be easily reader and isn’t too small. Use Photoshop’s “Free Transform” tool to play around with the size and placement by pressing “Command + T” on a MAC and “Ctrl + T” on your PC keyboard as a shortcut.

6. ) Layer Opacity
Perhaps one of the most important steps is to set the opacity of your watermark. If your opacity is too low, then you’ll have trouble seeing your watermark. If your opacity is too high, your watermark will be too dense and will distract from the actual image.
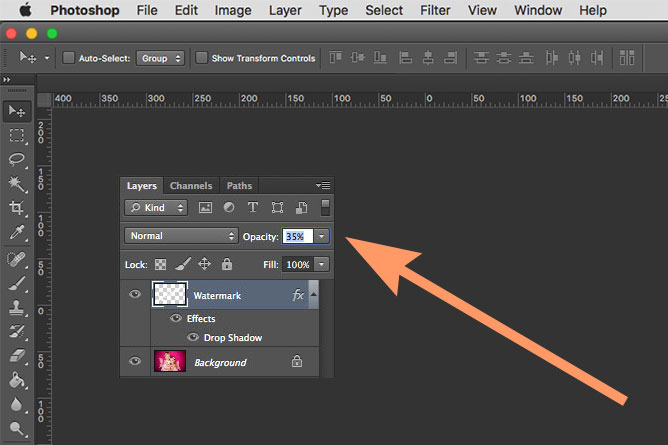
Start by reducing the opacity of your Watermark layer until you achieve a density that you are happy with. You’ll find the opacity setting located in the layers panel. Remember you don’t want it to be obtrusive yet noticeable and to cover a reasonable area of your photograph.
That’s it… In a future blog post we’ll look at using photoshop actions to automate the process of adding your newly created watermark to multiple images at one time.


Hi Annabella ! You have really given easiest guidelines for creating a watemark in photoshop. Can you suggest any resource for creating a 3D watermark using photoshop ? I want to make a unique but appealing watermark if you know how to. Thanks in advance !
Thank you for the kind words Kalpana, I’ve yet to publish a tutorial on 3D design but searching Google you’ll find lots of great examples of how to use Photoshop to create watermarks that give the illusion of a third dimension.