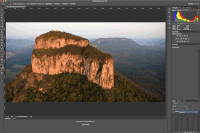
Camera Raw’s interface makes it extremely easy to edit RAW image files with precision and can circumvent the need for additional (potentially destructive…) adjustments within Adobe’s Photoshop.
But, what if you don’t have a camera that shoots in raw? Can you still take advantage of Camera Raw’s nondestructive editing?
Well, the answer to that question is yes.
Even if your camera only shoots in JPEG or TIFF, you can still open and edit these files in Adobe Camera Raw and take advantage of most of the associated benefits.
What File Format Types Can Camera Raw Open?
It may not be apparent or obvious, but Adobe’s Camera Raw plugin can open and editing numerous image file formats that include:
- RAW Files (.CRW (Canon), .NEF (Nikon), .ARW (Sony), .RAF (Fuji) & .DNG (Adobe))
- JPEG (Joint Photographic Experts Group)
- TIFF (Tagged Image File Format)
- PSD
Unfortunately, Camera Raw can’t open and does not support PNG (Portable Network Graphic) or GIF (Graphic Interchange Format) image files.
For a list of all supported camera models, please visit the Adobe Camera Raw Support Page. Select your camera brand for specific information on supported file type extensions and required version of software.
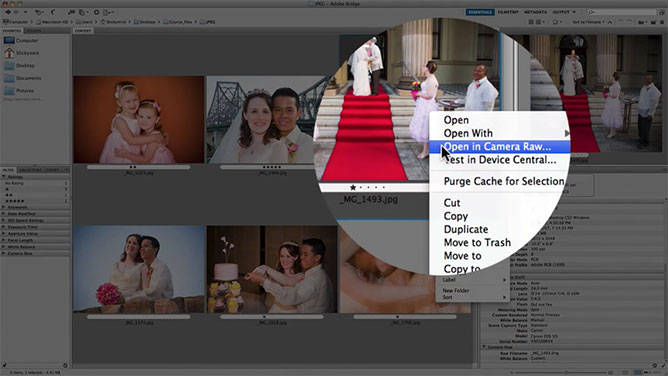
How To Open Camera Raw In Adobe Bridge?
If you don’t want to open up Photoshop, try using Adobe Bridge instead. The Camera Raw plug-in is built directly into Adobe Bridge and therefore you don’t need to load Photoshop.
In order to avoid opening your image in Photoshop, don’t double click on it. Instead right click on your image and select open in Camera Raw. This will open Camera Raw, but it will load within Adobe Bridge instead of Photoshop.
You’ll save a lot more computing power by only opening up Camera Raw and Adobe Bridge at one time, as opposed to having Adobe Bridge and Photoshop opened. Because evidently, Photoshop uses a lot more processing power.
With the way that digital SLR files are these days, they’re a lot larger than what most people are used to working with.
So, by having less applications open on your computer allows your computer to have more processing power dedicated specifically to editing your photos.
How To Set Camera Raw Preferences For Opening Images?
If you go up to the top left-hand corner where the tools are located, you’ll notice that there’s an Open Preference dialogue box.
If you click on that, you’ll see that Camera Raw Preferences will appear displaying general settings.
General
The first one allows you to choose where you’d like to store any changes to images on your computer. You can choose whether you’d like to store those image settings in SideCar XMP files, or if whether you’d like to store them directly in Camera Raw’s database.
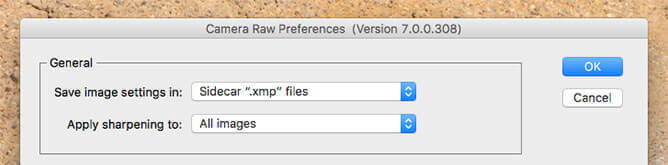
I prefer to use Camera Raw’s database, but it’s entirely up to you. Next, you can choose, whether you’d like to apply sharpening to all images, or just preview images.
Default Image Settings
From here, you’ll notice you’ll have some default image settings. This is where you can set whether you’d like to apply auto-tone adjustments, auto-gray scale mixes directly to images as soon as they’re opened up in Camera Raw.
Now, I prefer to leave these off, especially if I’ve made changes to a Raw file that I’m quite happy with, and then I open it up again. Because if you open it up again with these settings set, Camera Raw will make it’s own mind up on how the image should look and actually change all those settings on you, which can be quite annoying.
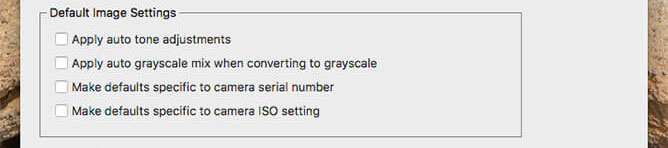
From here, you’ve got options whether or not you’d like to specify defaults specific to camera serial numbers. So, if you have multiple cameras that you’re shooting with and picked one of those is your preferred camera, you can set the defaults so they’re only applied to that specific serial number.
You also have the option just to apply defaults that set up in Camera Raw to specific ISO settings.
For example, if you mainly shoot in ISO 100, then you can have all the defaults and the sharpening and the lens corrections all set up for ISO 100. But when you open up a file that’s set to ISO 1600, you can choose that those settings aren’t applied to that file. Because for instance, that file may be a lot more noisy, and you don’t want the same sharpening applied to that ISO setting.
Camera Raw Cache
From here, we have Camera Raw cache, and this is where you can decide how much memory you want to allocate to Camera Raw.

For example, if Camera Raw’s running quite slow and you have some quite large raw files that you’re working on, you can choose to allocate a specific amount of hard drive space to Camera Raw.
The more you allocate, the faster and the better Camera Raw will perform for you when you’re working on larger files.
You’ll also notice that this purge cache, just here as well. Sometimes if the cache gets a bit clogged up, you can choose to purge the cache and you can also choose to select a location on where that cache is actually stored.
DNG File Handling
I work a lot on DNG files, so this is where you can choose where those files are handled.

I prefer to ignore SideCar XMP files because, obviously, with DNG files, that information is already included in a single DNG file.
Also, I like to update my embedded JPEG previews, so that they’re actually set to medium size. This is because I prefer to reduce the size of my DNG files. If I have it set to a full size, then obviously the size of the file is going to be quite larger than if it was set to medium size.
Jpeg & Tiff Handling
Now, as I’m sure you’re aware, Camera Raw can open JPEG in two files, so you can choose how those files are handled in Camera Raw preferences.
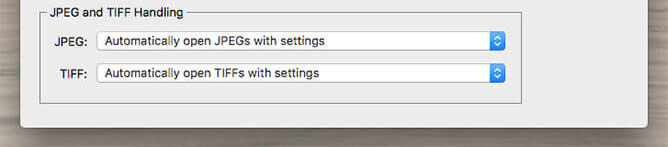
Now, we’ve got some automatic settings here, but you can also choose whether you’d actually like to disable JPEG and TIFF support if you’d like.
Contrasting Processes For Opening Image Files
Now, let me walk you through a couple of different ways of opening your JPEG and TIFF files in Camera Raw.
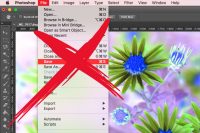
As you can see, I have a folder open here, and it only contains JPEGs. Let’s now go and double click on one of these JPEGs. As you can see, it’s opened up in Adobe Photoshop which is not what we want.
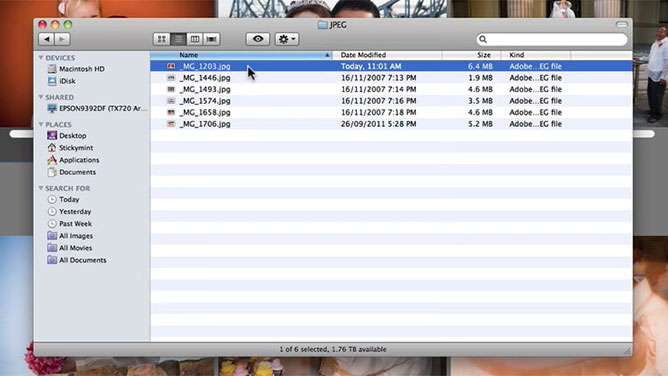
Let’s go and close that. That’s generally what happens.
Instead, Open In Photoshop…
What you can do instead of opening it directly from your folder there, if we were to open it in Photoshop you can select open and view the same folder.
You’ll see they’re all JPEGs there.

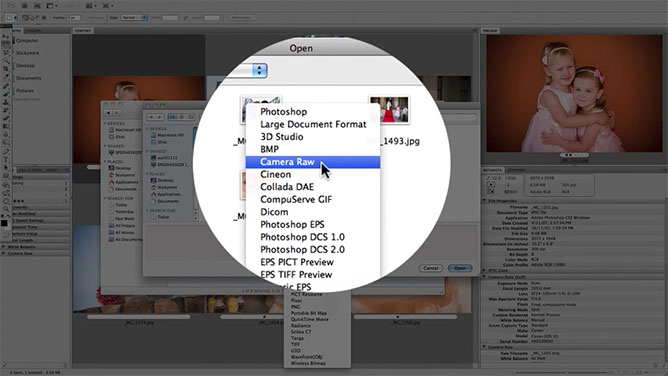
I’m going to open this file here. But, instead of leaving the format set to JPEG, change that and set it to Camera Raw. We’re sort of tricking Photoshop into automatically opening up your JPEG file in Camera Raw as opposed to ordinarily opening it up in Photoshop.

We set that to Camera Raw, and then we go click open. As you can see, it’s now opened up in Camera Raw. That’s how you get around opening up JPEGs or TIFFs in Camera Raw using Photoshop.
Once you start making changes to your JPEG files you’ll notice that it starts to write those corrections to your JPEG’s metadata. So, it’s nondestructive.
It’s not physically changing the file, unless you want it to. In that case you’d need to go and save it as a new file or open it as a copy of your original JPEG in order to physically change the original file information.
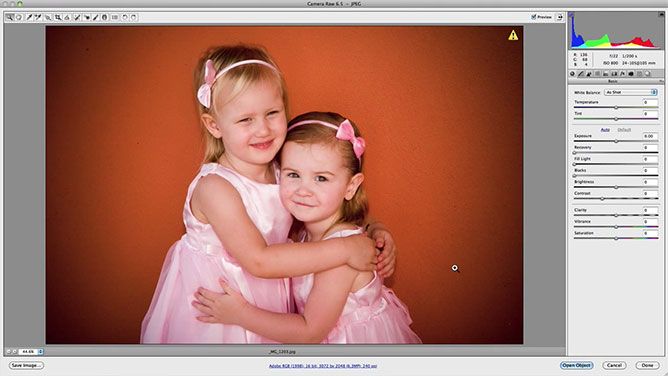
But, in this particular example any correction that I make to this file, it’s only getting stored in the metadata which is really neat, especially if you ever want to jump back or come back directly into Camera Raw itself and make further corrections to your JPEG or TIFF files.
With that said, I mean you can do the majority of all the different adjustments that are available to you in Camera Raw to your JPEGs. I mean within reason. Because, obviously, your JPEG files aren’t Raw files. So, they don’t contain as much information as a Raw file does.
But, you do have available to you all of the actual panel options and all of the tools. So, you can primarily make the majority of adjustments that are available to you to your JPEG and TIFF files. So, you’re really not limited.
To make simple corrections you can go through and just work your way through the panel making slight corrections here and there. It doesn’t take you that long until you’ve got a result that you’re reasonably happy with.
In Comparison
In comparison to Photoshop you have to set up different layers, use different filters and different adjustments like levels, curves, color balance, selective color, a whole range of things like that in order to try and reproduce similar color corrections that you can do in Camera Raw within a couple of seconds to a couple of minutes.
There’s a big difference in the ease of use using Camera Raw as opposed to trying to recreate the same results in Photoshop. That’s one of the main advantages of wanting to use Camera Raw to edit your JPEG and TIFF files.
How To Open Multiple Jpegs In Camera Raw?
Simply select the images you would like to open and either hold down Command (Mac) or Control (Windows) or shift. Then proceed to right click and select ‘Open in Camera Raw’.
The other main advantage of Camera Raw is the ability to batch correct by opening multiple JPEG files and adjust them all at once.
You can apply and synchronize settings across a range of photographs saving time, instead of trying to make those adjustments in Photoshop.
It’s very similar to using Adobe’s Lightroom, for example.


Share This Post With Your Friends...
Share the post "How To Open Jpeg & Tiff In Camera Raw"