As a photographer, learning how to print photos in Photoshop and get the most out of your inkjet printer is important.
The key to printing high quality photographs from Photoshop is being able to understand and configure the available printing options and color management settings to your exact printing requirements.
In this article, we’re going to delve in a little bit deeper and examine what are some of the settings that you can take advantage of inside of Photoshop when printing directly to your inkjet printer.
Keyboard Shortcut: Command + P (Mac) or Control + P (Win)
Go to ‘File’ in the main navigational menu, scroll to the bottom and locate ‘Print’, similar to any other software application that you have utilize.
If you click on ‘Print’ it’ll bring up the print settings. Within the ‘Print’ dialog box there are several important options to configure prior to printing photos directly from Photoshop to your home printer.
Customizing Your Print Settings & Presets
When you’re customizing your print settings, depending on your computers operating system, whether it’s a PC (Windows) or a Mac, you might notice slight differences with respect to available menu options.
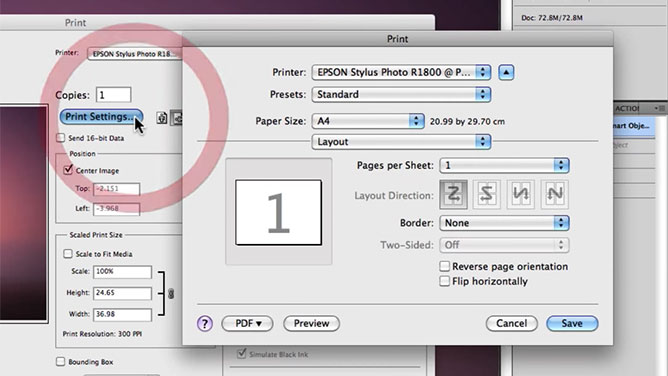
You shouldn’t notice any differences with this particular window, however if you click on ‘Print Settings’ there may be small noticeable differences with what you’re currently viewing in this tutorial.
I’m currently working on a Mac.
I have a variety of different options available to me that aren’t necessarily available to you if you’re working on a PC.
So, that’s just something to keep in mind…
However, Photoshop’s print dialog box which we’re currently viewing should be identical to that of a PC.
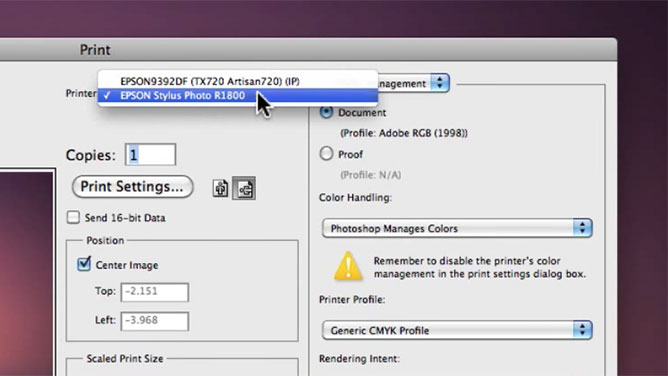
How To Set A Default Printer
The first thing you’ll notice when you look inside this window is you have your printer option. This is fairly self-explanatory and requires that you choose the type of printer that you want to print from.
Underneath the printer selection dropdown you’ll find all the common options that other software applications use for printing. There is the number of print copies, layout (eg. horizontal or vertical page organization) and print settings which we’ll quickly take a look at now.
- Printer – Available printers idle on your network.
- Presets – Customize setting predetermined and saved as a preset.
- Paper Size – Available paper formats (width x height) printer is capable of working with.
- Media & Quality – Type of media (eg. paper surface) & print quality setting.
- Layout – Pages per sheet, border, reverse page orientation and flip horizontally.
- Paper Handling – Collate pages, pages to print, ordering & scaling.
- Cover Page – Type (eg. standard, unclassified, confidential, classified, secret, top secret) and order (eg. before or after document).
Essentially ‘Print Settings’ can be customized according to your printer and how you want to set it up.
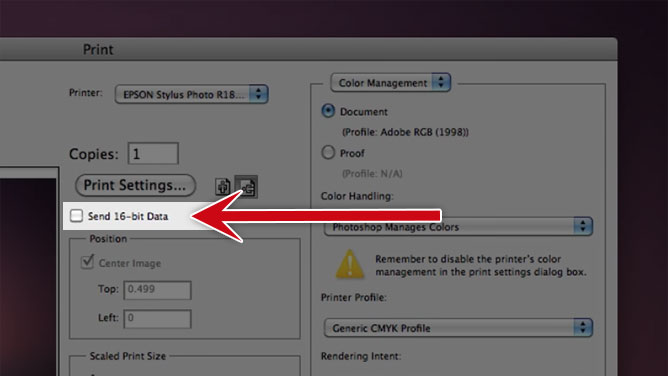
How To Change Bit Depth When Printing
Underneath print settings is ‘Send 16-bit Data’ which when checked enables Photoshop to send 16-bit data from your photos to the printer for higher quality prints.
What Is 16-Bit Data Or Bit Depth?
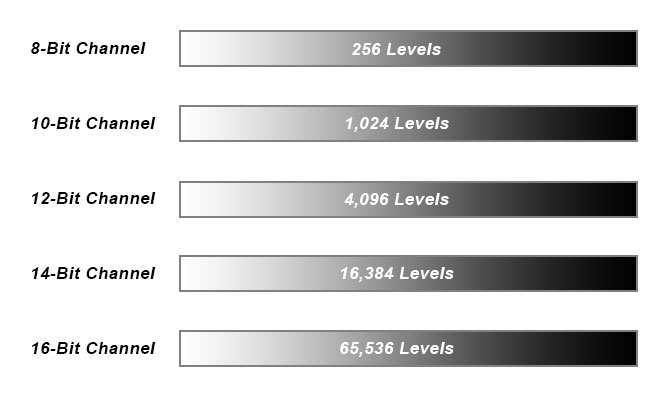
Digital cameras capture light in 12, 14 and 16 bits of information, which may sound all technical…
But, it’s just a fancy way of saying how many levels of information can be captured by your digital camera sensor and stored within each raw file.
An example of this would be a standard 12-bit digital camera and when you times 2-bits by the power of 12, you end up with a camera that is capable of capturing 4,096 levels of information that can be manipulated.
Unlike a standard 8-bit JPEG converted in-camera, which only contains 256 levels of information (0-255).
‘Send 16-bit Data’ is quite useful for sending all the information of your image file directly to the printer to produce a higher quality print, without having to convert it down to 8-bit.
In the past, photographic printers (eg. Durst Epsilon’s or Lambda’s) utilized by large photographic labs to print their clients photographs would require 8-bit files in order to print them.
They wouldn’t print from 16-bit files and you’d have to flatten Photoshop files and convert them to printer color profiles to make sure they were ready for printing.
But printing directly from Photoshop you don’t have any of those limitations.
You can print directly to your printer using 16-bit data if you want and achieve a higher quality prints.
Obviously larger file sizes are going to take slightly longer to print because you’re sending more data to the printer as opposed to that of an 8-bit file. In some cases, that’s going to be twice the file size.
How To Position An Image Prior To Printing
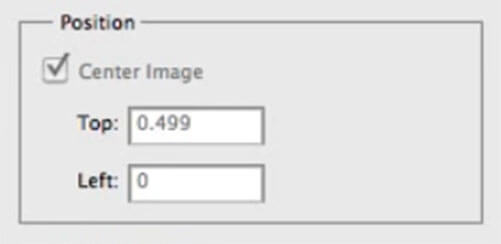
Underneath the ‘Send 16-Bit Data’ checkbox is ‘Position’.
Position as the word implies is fairly self-explanatory and allows you to position your printed image precisely within the canvas area of your paper.
Adding a border or deciding whether your printed image should be center or off-center for the purpose of mounting or framing is easy.
How To Scale Up Or Down An Image For Printing
Underneath ‘Position’ is ‘Scaled Print Size’ option which enables you to ‘Scale To Fit Media’ or when unchecked to resize your image.
By entering a custom width and height or specifying a scale percentage you can determine precisely how large or small your images will be printed.
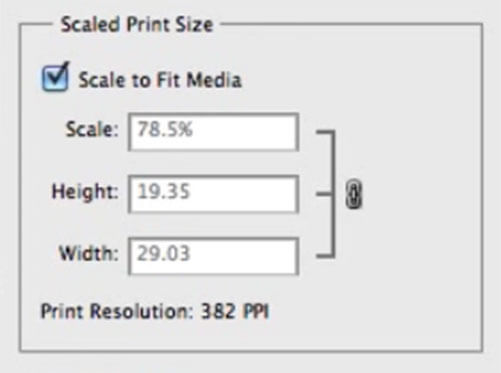
The link icon indicates that the scale, width and height relationships are locked and preserved.
Therefore, when one value changes it will directly influence the remaining and prevent accidental distortion of the image during resizing.
The majority of time I would select ‘Scale To Fit Media’ unless I required an exact border for mounting and/or rebate for framing.
What Is The Bounding Box?
The bounding box is a rectangle border that is highlighted around the edges of the image. It allows you to move, transform, rotate and scale the image using the mouse cursor.
Colour Management Options
Before I explain each of the color management options…
What Is Color Management & Why Is It Important?
Color management is the controlled conversion of color values and their relationships between various devices such as digital cameras, film scanners, monitors, photographic printers and papers through the use of color profiles.
The prmary goal is to achieve colors that match across each device which in return gives you the photographer consistent results.
The color management options within Photoshop’s print settings present as document or proof.
- Document – Shows the name of the document profile. When no profile is embedded in the document, this shows the profile as specified in the Color Settings dialog box. If “Photoshop Manages Colors” is selected, make sure to set the profile for your printer in the Printer Profile pull-down menu.
- Proof – Prints the document by emulating how it will output on another device, such as a printing press. If color handling is set to “Photoshop Manages Colors”, use the Printer Profile menu to specify the profile of the device you are printing to. The proof profile shows the name of the profile used to convert colors to the device you are trying to emulate.
Color Handling
Photoshop provides two options for the handling and management of color values through the printing process:
- Printer Manages Color
- Photoshop Manages Colors
I prefer to enable ‘Photoshop Manages Colors’ which I find gives me the greatest control.
Printer Profiles
Choosing whether you want to utilize the documents existing color profile or specifying a color profile that you want to use for soft proofing is easy.
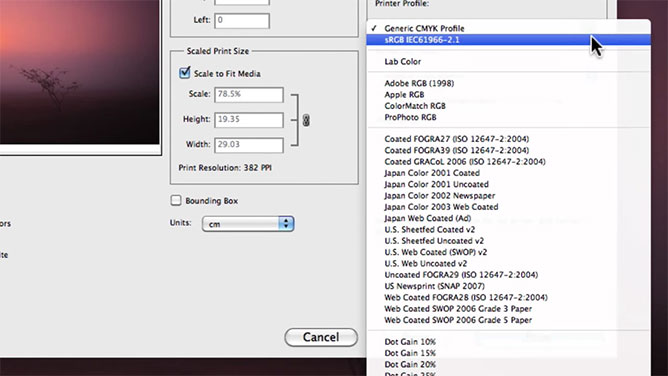
In the dropdown menu, select an appropriate color output profile that you would like Photoshop to convert your image to prior to printing.
Or, if you selected the color handling option ‘Printer Manages Color’ the color output profile you would like the printer to use.
Ink & Paper Profiles
In this case, I’m going to utilize ‘Photoshop Manage Colors’ and specify an output inkjet and paper profile that have been profiled by the printer manufacture Epson.
Under printer profile, you’ll notice that I have quite a few different printing profile options and at the very bottom all of my Epson R1800 paper profiles are visible.
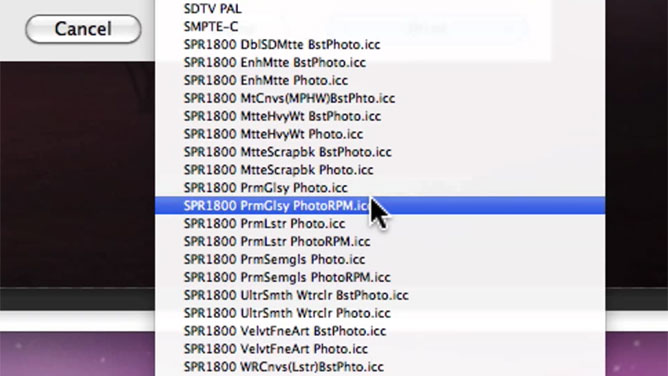
For each inkjet paper surface, I have about two output profiles that I can select according to the particular paper type that I’ve decided to print my photograph on.
Type Of Paper Surface
Each set of printer inks is defined by a characteristic color gamut and it’s ability to be reproduced is dictated by the qualities of the inherent paper surface on which you print.
Therefore, if I were to select my premium glossy paper profile you would notice that it’s potential color gamut is greater than that of premium matt paper and is noticeable on the image preview.
With ‘Photoshop Manages Colors’ checked, prior to printing Photoshop will convert from Adobe RGB to the selected output profile which in my case would be premium glossy photo, an accurate representation of the achievable print quality using Epson premium glossy paper stock.
Conversion Rendering Intent
Below printer profile is the ‘Rendering Intent’ options, which I’ve discussed in a previous video tutorial.
What are Rendering Intents?
Photoshop’s Definition: A computer monitor has more colors and saturation than photo paper. A digital image can have colors that a printer can’t reproduce. Colors that can’t be reproduced are called out-of-gamut colors. The gamut is the color space that a device can reproduce. Rendering intents decide what to do with the out-of-gamut colors.
Four different Rendering Intent Options available and they are:
- Perceptual – Delivers colors that are natural for human eyes. Takes the out-of-gamut colors and moves them to the closest in-gamut colors. Shifts the inside-gamut colors so the relationship between all the in- and out-of-gamut colors remains the same.
- Saturation – Preserves saturation over color. Pulls saturated colors out to the edge of the gamut, increases color ‘strength’.
- Relative Colorimetric – It moves out-of-gamut colors to the closest in-gamut color, keeping in-gamut colors unchanged. Little altering of the colors in the image.
- Absolute Colorimetric – Good for proofing. If necessary, adds a ‘tint’ of paper color for simulation.
Earlier, I’ve mentioned that utilizing either perceptual or relative colorimetric as the rendering intents would achieve the most desirable high quality results.
Then, I’m going to make sure that I check on black point compensation, because I want to really make sure the black points of the image stay consistent.
What is black point compensation?
Photoshop’s Definition: Black point compensation adjusts for differences in black points when converting colors. If checked, the full range of the source space is mapped to that of the destination space.
This setting is useful if your document and your printer have about the same size gamut, but one has a darker black than the other.
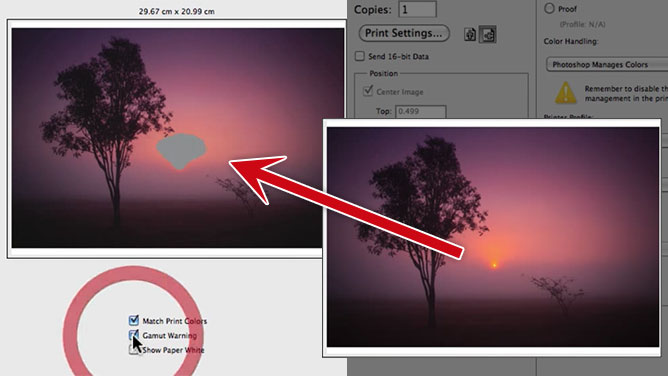
Match Print Colors
If you would like the image preview to accurately match the print colors ensure you have selected the appropriate color management options (including the output profile) and then check the ‘Match Print Colors’ checkbox.
When you turn on and off this option you’ll notice the image preview change. The amount the image preview changes will be determined by the image and the print settings configuration.
Gamma Warnings Preview
Below image preview and match print colors option is ‘Gamma Warnings’.
What are Gamma Warnings?
Gamma warnings as represented by gray in the image preview, identify color values that are outside of the selected printer profile and will not be accurately reproduced in print.
If you wish to overcome these limitations you will need to pay close attention to the conversion process and rendering intents used.
For example, you may want to convert your image into a smaller color working space like sRGB prior to printing.
Don’t forget to check out my video tutorial explaining what is Soft Proofing? and how can you use it to your advantage in Photoshop to create optimal color prints.
Paper White
Next, we have the ‘Show Paper White’ setting.
Often when printing you’ll choose a photo paper that has an off-white (not a pure white) surface. Off-white has a warmth and yellow tone that can be easily identified in the highlights or whites of the paper prior to and after printing.
By turning this option on Photoshop will simulate the white point of the paper in the image preview to give you an idea of how your image will reproduce in print.
I’m going to leave the ‘Show Paper White’ option unchecked and turned off.
With respect to color managing of your photographs, Photoshop’s Color Management panel within the Print dialog window offers a high level of control.
Conclusion
After the completion of configuring all of the print settings the image is ready to be sent directly to the inkjet printer for printing.
I hope you’re enjoyed this tutorial and if you have any further questions, please don’t hesitate to ask in the comments below.


Share This Post With Your Friends...
Share the post "How To Print Photos In Photoshop For Beginners"