Image resizing can be relatively simple and straightforward especially when working within software applications like Photoshop. However, you need to understand the fundamentals of resizing to avoid degrading the quality of your images.
Photoshop’s image resizing is located in the main navigational menu underneath “Image / Image Size”. Upon opening the dialog window you will be presented with the pixel dimensions of your document or image including its file size.
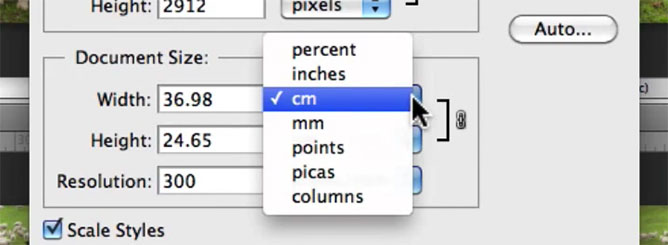
Pixel Dimensions
So, as you can see the file size of my image is 72.8 megabytes and it’s overall dimension is 4368 x 2912 pixels. Clicking on “pixels” provides your with an option to resize your image by percent which I’ve never found very useful.
Now, if you wish to resize your images for the web you’ll need to focus on pixel dimensions which is what monitor and screen resolutions are based.
I would prefer to use Photoshop’s Save for Web command listed underneath “File” in the main navigational menu, however if your images are too large you may have to resort to reducing the resolution of your image using “Image Size” prior to using launching “Save for Web”.
Document Size
Underneath pixel dimensions is the document size which presents the exact dimensions and resolution of your image. Once again, we have the width and height represented in different units of measurement from millimeters, centimeters and inches.
To the right of the width and height measurement you’ll notice a little bracket with a link icon indicating that the constrain proportions option is checked which we’ll be discussing shortly.
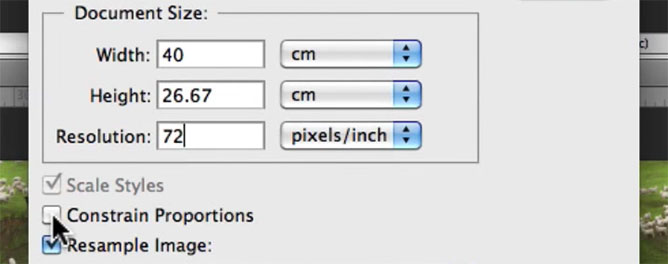
Changing the size of your document or image only requires adjusting the appropriate numbers according to your exact requirements. If I wanted to resize this image to be 40 centimeters, I would adjust the document width accordingly which would also alter the file and pixel size. For example, my original image of 72 megabytes has increased to 85 megabytes.
Image Resolution
Below the pixel and document dimensions is the resolution displayed in pixels per inch (default). If you intend on printing your images you’ll need to pay particular attention to whether or not you have the correct resolution set.
Photographic printers are resolution dependant whilst inkjet printers are not and therefore you’ll need to save your image files in the format required by your output device.
In general, I recommend you set your resolution to at least 254 pixels per inch (standard metric), however these days most photographers size their images to 300 pixels per inch which has become widely accepted as the industry standard.
If you’re saving images for the web you won’t need to worry about resolution because images displayed on the internet are entirely pixel-based and not resolution dependant.
Constrain Proportions
Enabling constrain proportions will prevent the image from being distorted during the resizing process, maintaining the original aspect ratio of the image with regards to the width and height values.
Of course, if you wish to distort your image simply uncheck constrain proportions and change the width and height accordingly. But with that said, I’ve never unchecked this option instead preferring to use the transform tool.
Scale Styles
When resizing images in Photoshop you need to take into consideration any effects and/or text that you may have introduced into the image scale proportionally. To ensure that this happens automatically make sure that the “Scale Styles” checkbox has been enabled.
If you don’t check scale styles you’ll end up with effects and text that aren’t of the same proportion to the resized image which will disturb your original composition.
Resample Image
The most important option within image size is “Resample Image” which determines what type of interpolation will be used to perform the resizing. Interpolation refers to how Photoshop will create or remove pixels from within the image during the resizing process.
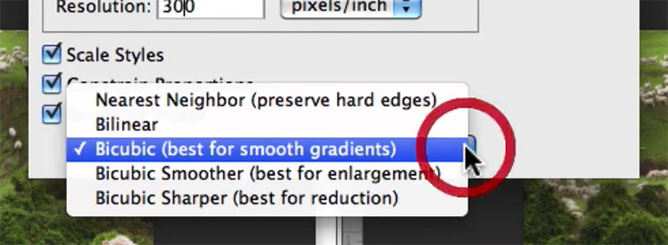
In the drop down menu you’ll find five different options and depending on which you select will determine how your image will be processed and what characteristics will be enhanced or bypassed.
- Nearest Neighbor (perserve hard edges) – Is fast, but less precise than any of the other methods of interpolation, sampling the nearest neighbor pixel as a reference for reproducing pixels. Therefore, I don’t recommend using this option.
- Bi-linear – Adds pixels by averaging the color values of the surrounding pixels and produces medium-quality results. Therefore, I would not recommend using this option either.
Bi-cubic Interpolation
The interpolation method I recommend utilizing is Bi-cubic.
- Bi-cubic (best for smooth gradients) – Is slower than Nearest Neighbor or Bi-linear, however it’s more precise in examining the values of surrounding pixels and uses complex calculations to achieve smooth tonal graduations which is important for accurately resizing images.
Bi-cubic Smoother and Bi-cubic Sharper are slight variations of Bi-cubic interpolation.
- Bi-cubic Smoother (best for enlargement) – Is a more subtle version of Bi-cubic and was designed to be applied to images that required an increase in size. Enlarging images introduces pixelization which can become quite evident and Bi-cubic Smoother helps to reduce the appearance of any hard edges.
- Bi-cubic Sharper (best for reduction) – Is the complete opposite to Bi-cubic Smoother and is primarily intended to be applied to images that require a reduction in overall size. Often high resolution images that are resized for display on the web (for example) lose detail, appearing soft and can require additional sharpening.
Image size is an extremely helpful feature of Photoshop that I use as part of my daily editing workflow, however it’s important to remember that raw files should be enlarged within Adobe Lightroom or Camera Raw prior to importing them into Photoshop if you wish to maintain quality.
Don’t forget to learn how to resize multiple photos in Photoshop.
Frequently Asked Questions
At what size enlargement would you use the bicubic smoother (best for enlargement)?
It would depend on the original resolution of your image. For example, you can usually get away with enlarging digital images twice their original resolution eg. 2400×3600 pixels increased to 4800×7200 pixels.
It’s around this point that you’ll start to notice interpolation problems like distinct pixel edges appearing within an image. Therefore, I would recommend using bicubic smoother for anything above two times the original resolution of the image.
How do I scale logos to immense proportions without losing quality?
Logos should always be created as a vector postscript file format (eg. EPS). Vector files are based on lines not pixels and therefore aren’t rasterized which allows them to be sized to any size you wish without losing quality.
In Photoshop this can be achieved by using fonts, pen tool and then saving files in an EPS or PDF format. If you would like greater control consider creating your original logo file in a vector based program like Adobe Illustrator and then exporting it. The EPS or PDF file you export can then be rasterized to any size you like using Photoshop in the future.


Hi,
I am blowing up 4×6 pictures into 24×36″ posters for display at a reunion. I am sort of a novice at Photoshop and love to learn new things. Your post helped me significantly in setting up my file for print. Thanks to you I can’t wait to see the final result. Would also love to learn more from you to continue developing my PS skill sets.