Layers are the foundation of editing images in photoshop. If you want to improve your photoshop skills then take the time to learn the in’s and out’s of layers, they’re important.
In this part one of a series of blog posts on layers, we’re going to look at how you can take advantage of layers in your day to day editing workflow.
You’ll find the Layers panel located on the right hand side of your photoshop workspace, but if for some reason you can’t see your layers panel, go to the main navigational menu, click on “Window” and then scroll down and select Layers to open the panel.
The first thing you’ll notice is that every image or document you open automatically has a background layer which is the foundation of your image.
Layer Types
Photoshop has seven different layer types that have all been designed for specific tasks and the majority of which can still be edited in a similar manner using fundamental principles.
- Image Layers
- Adjustment Layers
- Fill Layers
- Shape Layers
- Text Layers
- Smart Objects
- Video Layers
So as you can see, an image can be made up of multiple layers, and it’s important to understand not only the different types of layers on hand, but also actually how to use those layers in conjunction with each other in order to create better photographs.
Understanding Layers
To understand how layers work, let’s take a look at the example image below…
So as you can see we have one image, but if we were to look at layers you would notice that there are multiple layers stacked one upon another which creates a composite.
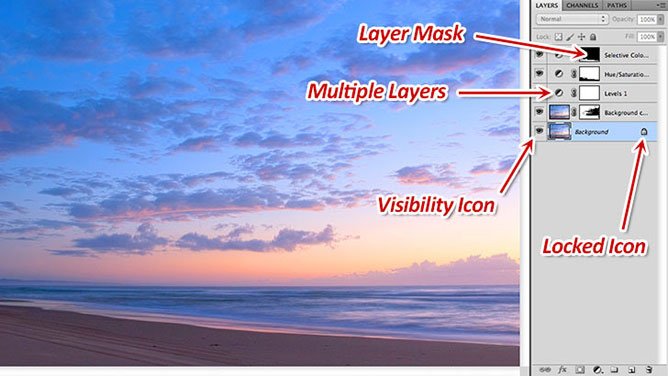
To the left of each layer is an eye icon – which allows you to turn on and off the visibility of a layer. As I turn off certain layers it becomes clear that this photograph has been constructed using more than one image.
Photoshop layers can be easily moved by using the move tool and clicking on the selected layer and repositioning it around the canvas. Layers can be organized by placing one layer either above or below another layer.
Layer Transparency
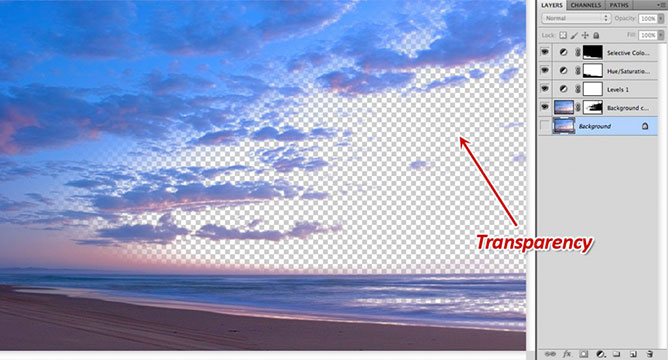
Each layer has the potential to be transparent where only selected areas of a layer are visible and all excluded areas transparent, just as if you were looking through sheets of glass that contained individual portions of an image.
The Checker board pattern that is seen when turning off the visibility of the background layer is photoshop’s way of indicating transparency.
Each Layer can be independently be adjusted without effecting other layers which one of the benefits of using layers. So as I move and resize this layer, all other layers remain untouched.
Notice the lock icon on the background layer, this simply means the background layer can not be moved around, but that doesn’t mean you can’t make adjustments to that layer.
If the background layer is locked and has italic writing, this identifies the background layer as having no transparency which really only occurs when you open an image for the first time, but if you double click on the layer and change its name and click okay, the background layer will change to a layer that is capable of transparency.
As you begin to stack and order different elements within an image and start to understand that what is on top is essentially what you going to see, over whatever is underneath, except where transparency is involved, you’ll come to realize that layers have the potential for unlimited creativity.
And with unlimited creativity, layers also offer a means for non-destructive editing, which is a real positive and one that establishes the foundation from which your complete editing workflow is built.
How to Organize Layers in Photoshop
One of the issues that you’ll run into when you start creating multiple layers in Photoshop is losing track of which layer belongs to what element within your photo, especially once we introduce selective layer masks.
So how can we effectively manage and organize layers to make your editing workflow more user friendly? The photograph you are looking at is one I took quite a few years ago of a “Lady Bowen” Falls in Milford Sound on the South Island of New Zealand.
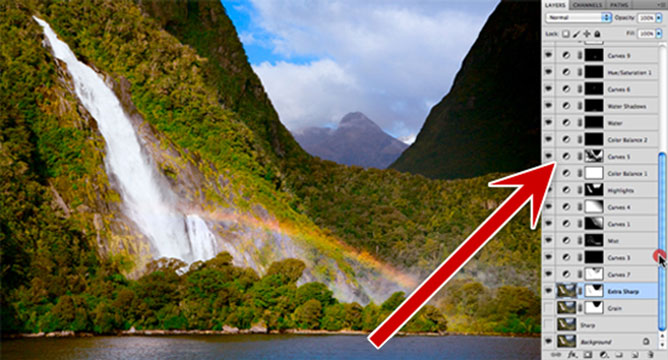
As you can tell by the amount of layers in this file, I’ve spent a lot of time editing this image using older versions of Photoshop. It’s a perfect example of how complicated a photoshop file (.psd) can become once you introduce layers to an image.
In order to avoid your files turning out like this we need to manage and organize layers appropriately, so that they can be easily understood. What I’ve done is created another photoshop file that I’ve been playing around with to demonstrate how to group layers in photoshop easily.
As you may or may not know all layers can be re-ordered and it’s key to get the ordering of your layers right, especially when making adjustments.
Grouping, Organizing & Labeling Layers
Now to organize your layers, photoshop has a feature called “Groups” as represented by the folder icon. Groups allow you to place any layer within individual groups created by you.
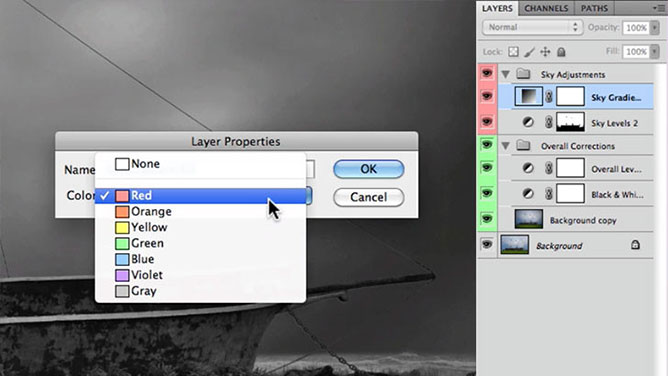
You can prioritize your groups and layers by using colored labels to identify them by right clicking on the target layer and then naming and choosing a specific color for your label.
Make sure you give your layers a name that is obvious and can be easily understood.
So groups and labels are crucial to clearly distinguishing which layers belong to what and if your anything like me, you’ll want to use them in order to avoid any confusion in the future.


Share This Post With Your Friends...
Share the post "How to Use & Group Layers in Photoshop"