Imagine capturing an image and investing hours post processing within Photoshop prior to achieving artistic gratification. The next day, happy with your accomplishment you’re ready to share your photography with the world.
Upon reopening the image within Photoshop you’re shocked to discover that the colors don’t look right, washed out or oversaturated and completely unacceptable.
Immediately wondering, why Photoshop is saving colors wrong? I often get asked this question and the solution to this problem is relatively simple, albeit intricate.
Essentially the image hasn’t been correctly color managed, converted to and embedded with the appropriate color profile. As a result, Photoshop does not have the right information in order to accurately display or print your image.
In this article, we’re going to explore what is color management, why it is important and exactly how to control colors within Photoshop, so that your images display and print as intended.
What Is Color Management?
“Color management” refers to the controlled conversion of color values between various devices (e.g. digital cameras, image scanners, monitors, ipads/tablets and photographic printers) through the use of color profiles to achieve accurate and predictable outcomes.
In short, what you see in your camera and on your computer monitor is a close match to that which is displayed in a photographic print under controlled lighting conditions.
Of course, there are a lot of variables and technical aspects of color management that need to be taken into consideration.
But, it’s important not to become overwhelmed and that how you choose to integrate color management into your editing workflow should be proportionate to your skill level and specific requirements as a photographer.
Also, don’t forget that the complexity of colour management increases when moving between color modes i.e. RGB, CMYK and LAB which can make achieving your desired outcome more difficult.
Color Working Space Profiles
The essential color working space profiles that are predominantly used by the photographic community include:
- sRGB (Small)
- AdobeRGB 1998 (Medium)
- ProPhoto (Large)
Each of these working space profiles is structurally different in shape, size and tonal depth which determines the range of potential color values that fall within their boundaries.
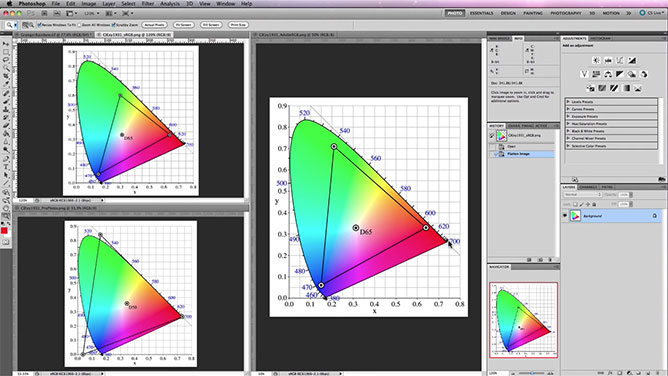
When working with raw image files, it’s best to attempt to maintain your digital camera sensors original color values and their relationships through using an appropriately sized working space profile.
Selecting an appropriate color profile will depend on your subject matter, lighting conditions and diversity of color. But, essentially as a rule of thumb it’s best to use a profile that contains all of your digital camera sensors potential color values to avoid losing valuable data throughout post processing.
However, sometimes it is unrealistic to maintain large colour working space profiles like Prophoto which contain color values that cannot be accurately reproduced, due to the restricted color range of output process whether that be display or physical print mediums.
For the most part sRGB or AdobeRGB 1998 provide the most appropriate color gamuts that are easily reproducible and therefore won’t cause too many headaches with respect to achieving accurate color between devices.
When Can Color Profile Mismatches Occur?
If Photoshop’s settings aren’t configured correctly, it can lead to colour management mismatches where images are not displayed using the appropriate color working space profile, resulting in poor color presentation and inaccurate color rendering.
Common situations when this problem can occur include:
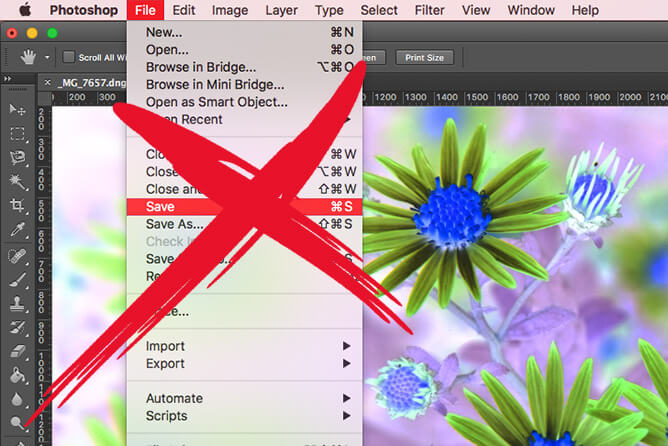
- Saving or exporting an image as jpeg (or any other file format) using “Save As” or “Save For Web”
- Converting between different “Image Mode” color spaces (eg. RGB – CMYK)
- Sending image files from Photoshop to an inkjet printer
- When the colour balance of your computer monitor or tablet is incorrectly (eg. you’re running a program like f.lux which adjusts the color temperature according to the time of the day)
What Factors Influence & Can Cause Color Mismatches?
With numerous reasons as to why this problem can occur, an inexperienced Photoshop user can be forgiven for not fully understanding or pinpointing the exact cause of their color management troubles.
Generally speaking, complications arise from not using the correct color profile when editing images within Photoshop. Color profile problems can occur from a variety of incorrect workflow decisions and/or color settings within Photoshop.
Examples of why you may be experiencing difficulties include:
- Not embedding color profile with images upon saving or exporting
- Not selecting the appropriate color profile upon opening an image (“Embedded Profile Mismatch”)
- Selecting “Use the embedded profile” which may not be an appropriate workspace or printing profile for your requirements
- Assigning an inappropriate color profile to a document
- Converting a document’s color profile to an unsuitable working space
- Discarding the embedded profile and ignoring color management practices
A momentary lapse in concentration can inevitably lead to decisions and actions that can negatively affect your color management workflow causing catastrophic outcomes.
Why Is It Important To Prevent Color Management Issues From Occurring?
The consequences of not taking the time to address color management issues that you may have can produce undesirable effects that detract from your overall photographic expression and creative direction as an artist.
Images that aren’t viewed with the intended color profile could appear washed out or oversaturated with disappointing contrast, brightness and tonal values.
Images that aren’t correctly color managed and converted from working space profile (e.g. Adobe RGB) to an output profile (e.g. specified inkjet printer), the eventual photographic prints will not accurately represent that which is viewed on your computer monitor or ipad/tablet.
Additional unwanted expenses (eg. refilling ink cartridges, paper stock or printing services etc) can be accrued due to having to reprint photos that haven’t turned out as expected.
As you can see, color management plays a vital role in maintaining consistent workflow practices that generate predictable results without fail.
How To Solve Color Management Problems & Ensure Colors Save Correctly?
With so many potential things that could go wrong with your Photoshop photo editing workflow, how do you prevent them from occurring and achieve accurate color renditions each and every time?
- First, ensure that you are editing within the appropriate color working space (e.g. sRGB or AdobeRGB) and color mode (e.g. RGB, CMYK or Grayscale).
– Confirm your digital camera’s default color profile is set to either sRGB, AdobeRGB or ProPhoto to provide relevant metadata and guidance throughout post processing.
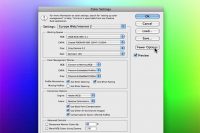
– Set Photoshop’s default color working space and conversion options from within the “Color Settings…” dialog window.
- When choosing “Save As” to export your images, ensure that you have selected the “Embed Color Profile” checkbox in the dialog window before saving your work.
Upon opening or printing an image with an embed a color profile, Photoshop (if correctly configured…) will immediately ask if you would like to continue using the embed color profile for color management.
- If upon reopening image files, Photoshop doesn’t ask you whether you would like to use the embed color profile, then go to “Edit > Color Settings”.
Within Color Settings, locate “Color Management Policies” ensuring that all checkboxes listed under “Profile Mismatches” and “Missing Profiles” are selected by default.
How to Preview Your Photographic Print Prior To Printing?
When editing images within Photoshop utilizing working space profiles, any adjustments made can present favourable. However, it’s important not to get carried away making extreme color corrections without fully understanding the impact that it will have on your final output, especially if printing is involved.
To avoid unnecessary heartache and to preview accurate color representations of your photography output, I recommend using Photoshop “Soft Proofing”.
What Is Soft Proofing?
Simply put, soft proofing enables you to remain editing in your color working space (e.g. AdobeRGB) whilst viewing your image through another profile, specifically your printer’s output profile. Thus, enabling you to view your color corrections through the eyes of your printer in real time, without intentionally sacrificing color or tonal values during the editing process.
Of course, it goes without saying that you must have accurate color management profiles for your output processes or otherwise soft proofing will be unreliable and imprecise.
The color profiles supplied by inkjet and paper manufacturers offer potentially great outcomes, however your mileage may vary and you should always test by printing color management charts/scales to compare and contrast.
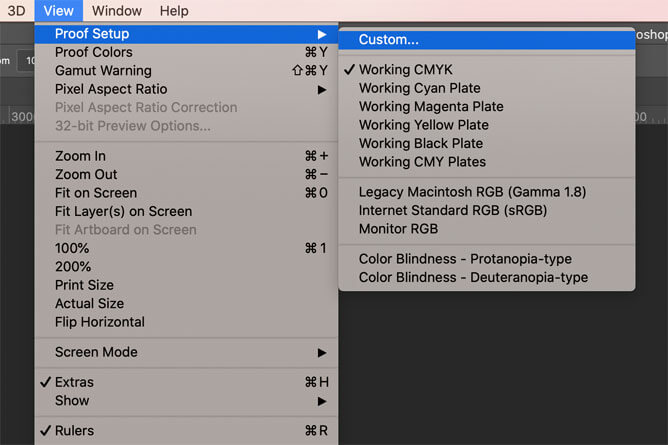
To configure “Soft Proofing” default settings, proceed to Photoshop’s top navigation menu and select “View > Proof Setup”. Here you’ll find settings that will mimic the potential output of your chosen paper type and printer.
- Presets – Self explanatory, once you have configured your preferred Soft Proof settings click save and set these as your default settings.
- Device to Simulate – Select the appropriate color output profile for your paper type and printer. Then, select whether or not you want to “Preserve CMYK Numbers” which will simulate how colors reproduce without performing a color space conversion and affecting the original color values.
- Rendering Intent – When converting images between color profiles, Photoshop utilizes rendering intents to manage how color values are mapped and organised accordingly within color spaces. There are four rendering intents available and each handles the color conversion process differently.
Watch the video tutorial above, where I explain exactly how rendering intents manage color values and why I recommend utilizing perceptual or relative colorimetric for photography.
- Black Point Compensation – Maintaining true blacks when converting between ICC color profiles can be challenging due the variability of color gamuts and rendering intent used. I recommend selecting black point compensation to ensure your images preserve true blacks throughout the conversion process.
- Display Options (On-Screen) – When printing your photography, you’ll quickly discover that the brilliance of whites and density of blacks displayed on LED computer monitors or ipads aren’t necessarily representative of those found in a photographic print.
Photoshop’s soft proofing attempts to “Simulate Paper Color” (e.g. offwhite) and/or “Simulate Black Ink” on screen to overcome any perceivable differences. Acting as a visual filter, these settings aren’t applied to your image file and therefore don’t affect tonal values.
To toggle on and off “Soft Proofing” you can go to “View > Proof Colors” or use the keyboard shortcuts “Command + Y” for Mac or “Ctrl + Y” for PC.
By toggling on Photoshop’s soft proofing, it’s easier to evaluate image adjustments in real-time to determine whether or not they will have the desired effect and reproduce as expected.
Troubleshooting
But, What If Your Prints Still Appear Unsatisfactory After Making Changes To Your Photoshop Settings?
Whilst color management is an exact science, when working from home with limited resources it can be easy to forget that you may not have all the required equipment (e.g. color spectrophotometer) or software to manage color with great accuracy.
However, improvements to your workflow can be easily achieved by ensuring that you have correctly configured your Photoshop Color Settings.
Here’s a quick troubleshooting checklist to help identify any potential issues that you may be experiencing:
- If you haven’t correctly configured your photoshop color settings, there’s a possibility you might be using the wrong color profile. View “Document Profile” to ascertain which profile your document is currently assigned.
- If you have opened an image in the wrong working space you can utilise “Assign Profile” to apply your original color profile and revert back to its previous appearance.
- Utilize “Convert to Profile” with perceptual or relative colorimetric rendering intent to change between color profiles accordingly.
In Summary
In this article you’ve learnt what is color management, why color profiles are important, potential causes or reasons why color mismatches occur.
We’ve discussed how to fix color management problems through improved color management workflow practices, enacting fail safes and what to do if you still encounter issues without explanation.
Although we’ve only scratched the surface when it comes to the science of color theory, the fundamental principles that you’ve learnt will help you on your journey to producing perfect photographic prints, time and time again.
Interested In Learning More?
For more photography tutorials, don’t forget to Subscribe To My Email Newsletter and Youtube Channel.


Share This Post With Your Friends...
Share the post "Why Is Photoshop Not Saving Colors Correctly?"